
USER MANUAL
_MINIFUSE 4

Special Thanks
DIRECTION
Frédéric BRUN Kevin MOLCARD Philippe CAVENEL Germain MARZIN
DEVELOPMENT
Jérôme LAURENT
Daire O'NEILL
Timothée BEHETY
Aurore BAUD
Benjamin REYNIER
Arthur RÖNISCH
Lionel FERRAGUT
Nadine LANTHEAUME
Jérôme BLANC
Corentin DEREY
Valentin DEPOISIER
DESIGN
Martin DUTASTA Morgan PERRIER Axel HARTMANN Olivier HEBERT
QUALITY ASSURANCE
Thomas BARBIER
Matthieu BOSSHARDT
Emilie JACUSZIN
Bastien HERVIEUX
Julien VIANNENC
BETA TESTING
Paolo NEGRI
Marco CORREIA
Bernd WALDSTÄDT
Khutornoy Maksim
JUREVICH
Erik VAN DE VOSSENBERG
Luca LEFÈVRE
David BIRDWELL
Navi RETLAV
Gert BRAAKMAN
Pierre GACHET
Charles CAPSIS IV
Andrew HENDERSON
Chuck ZWICKY
George WARE
Tony FLYING SQUIRREL
Terence MARSDEN
Kirke GODFREY
Adán SÁNCHEZ DE PEDRO
CRESPO
Are LEISTAD
Luis RODRIGUEZ
MANUAL
Stephan VANKOV (writer) Jimmy MICHON
© ARTURIA SA – 2022 – All rights reserved.
26 avenue Jean Kuntzmann
38330 Montbonnot-Saint-Martin
FRANCE
www.arturia.com
Information contained in this manual is subject to change without notice and does not
represent a commitment on the part of Arturia. The software described in this manual is
provided under the terms of a license agreement or non-disclosure agreement. The software
license agreement specifies the terms and conditions for its lawful use. No part of this
manual may be reproduced or transmitted in any form or by any purpose other than
purchaser’s personal use, without the express written permission of ARTURIA S.A.
All other products, logos or company names quoted in this manual are trademarks or
registered trademarks of their respective owners.
Product version: 1.0.0
Revision date: 15 September 2022

Thank you for purchasing the Arturia
MiniFuse 4!
This manual covers the features and operation of Arturia’s MiniFuse 4. MiniFuse 4 is a
professional-grade audio interface that empowers the recording and production of music
and audio content. Whether in the studio, on the road, or at home, we are confident that the
MiniFuse 4 will become an indispensable tool in your kit.
Be sure to register your MiniFuse 4 as soon as possible! There is a sticker on the bottom
panel that contains the serial number of your unit and an unlock code. These are required
during the online registration process at www.arturia.com. You may want to record these
elsewhere or take a photo of the sticker in case it becomes damaged.
Registering your MiniFuse 4 provides the following benefits:
• Access to the latest version of the Arturia Software Center and MiniFuse Control
Center applications
• Special offers restricted to MiniFuse owners
As a registered owner, you also have access to an exclusive software bundle that includes:
• Arturia's Pre 1973, Rev PLATE-140, Delay TAPE-201, Chorus JUN-6 audio effects
• Arturia's Analog Lab Intro containing thousands of ready-to-use instruments and
sounds
• Ableton Live Lite
• NI Guitar Rig 6 LE
• 3-month complimentary subscription to Splice
• 3-month complimentary subscription to Auto-Tune Unlimited
• Exclusive Ableton Live Lite sessions curated by producers around the globe
MiniFuse 4 is easy to use, so you’ll probably start experimenting with it right out of the box.
However, please be sure to read this manual even if you are an experienced user, as we
describe many useful tips that will help you get the most out of your purchase. We're sure
you will find MiniFuse 4 a powerful tool in your setup and we hope you'll use it to its fullest
potential.
Happy music making!
The Arturia team

Special Message Section
Specifications Subject to Change:
The information contained in this manual is believed to be correct at the time of printing.
However, Arturia reserves the right to change or modify any of the specifications without
notice or obligation to update the hardware that has been purchased.
IMPORTANT:
The product and its software, when used in combination with an amplifier, headphones or
speakers, may be able to produce sound levels that could cause permanent hearing loss.
DO NOT operate for long periods of time at a high level or at a level that is uncomfortable.
If you encounter any hearing loss or ringing in the ears, you should consult an audiologist.
NOTICE:
Service charges incurred due to a lack of knowledge relating to how a function or feature
works (when the product is operating as designed) are not covered by the manufacturer’s
warranty, and are therefore the owner's responsibility. Please study this manual carefully
and consult your dealer before requesting service.
Precautions include, but are not limited to, the following:
1. Read and understand all the instructions.
2. Always follow the instructions on the device.
3. Before cleaning the device, always remove the USB cable. When cleaning, use a
soft and dry cloth. Do not use gasoline, alcohol, acetone, turpentine or any other
organic solutions; do not use a liquid cleaner, spray or cloth that is too wet.
4. Do not use the device near water or moisture, such as a bathtub, sink, swimming
pool or similar place.
5. Do not place the device in an unstable position where it might accidentally fall
over.
6. Do not place heavy objects on the device. Do not block openings or vents of the
device; these locations are used for air circulation to prevent the device from
overheating. Do not place the device near a heat vent at any location with poor
air circulation.
7. Do not open or insert anything into the device that may cause a fire or electrical
shock.
8. Do not spill any kind of liquid onto the device.
9. Always take the device to a qualified service center. You will invalidate your
warranty if you open and remove the cover, and improper assembly may cause
electrical shock or other malfunctions.
10. Do not use the device with thunder and lightning present; otherwise it may cause
long distance electrical shock.
11. Do not expose the device to hot sunlight.
12. Do not use the device when there is a gas leak nearby.
13. Arturia is not responsible for any damage or data loss caused by improper
operation of the device.

Table Of Contents
1. Introduction...................................................................................................................................................................... 2
1.1. What Is an Audio Interface and Why Do I Need One ?.............................................................................. 2
1.2. MiniFuse 4 Features Overview...................................................................................................................................... 2
2. Connection Diagram................................................................................................................................................. 3
3. Front Panel Features................................................................................................................................................. 4
4. Rear Panel Features .................................................................................................................................................. 6
5. Setup..................................................................................................................................................................................... 7
5.1. Changing default system audio input and output .......................................................................................... 8
5.1.1. MacOS................................................................................................................................................................................................................................... 8
5.1.2. Windows ............................................................................................................................................................................................................................ 9
5.2. Using the MiniFuse 4 as an audio device with your DAW ..................................................................... 10
5.2.1. Configuring audio in Ableton Live..................................................................................................................................................................... 11
5.2.2. Configuring audio in FL Studio ........................................................................................................................................................................ 12
5.2.3. Configuring audio in Analog Lab ................................................................................................................................................................... 13
5.3. Recording audio into your DAW............................................................................................................................... 14
5.4. Using the MiniFuse 4 as a MIDI device with your DAW........................................................................... 15
5.4.1. Configuring MIDI in Ableton Live .................................................................................................................................................................... 15
5.4.2. Configuring MIDI in FL Studio.......................................................................................................................................................................... 16
5.4.3. Configuring MIDI in Analog Lab...................................................................................................................................................................... 17
5.5. Recording MIDI from the MiniFuse 4 into your DAW................................................................................. 18
6. MiniFuse Control Center......................................................................................................................................... 19
6.1. Top Toolbar .............................................................................................................................................................................. 19
6.2. Input Features ...................................................................................................................................................................... 21
6.3. Output Features.................................................................................................................................................................. 23
6.3.1. Creating Custom Mixes ......................................................................................................................................................................................... 24
7. Loopback Recording Feature............................................................................................................................. 28
7.1. Routing computer audio to the Loopback output/input ............................................................................ 28
7.1.1. Recording all computer audio............................................................................................................................................................................ 28
7.1.2. Record audio from specific applications .................................................................................................................................................... 31
7.1.3. Recording into your DAW..................................................................................................................................................................................... 33
8. A Quick Primer on Digital Audio..................................................................................................................... 35
8.1. What is latency?................................................................................................................................................................. 35
8.2. Sample Rate.......................................................................................................................................................................... 35
8.3. Buffer Size.............................................................................................................................................................................. 36
8.4. A red herring......................................................................................................................................................................... 37
8.5. How to deal with latency.............................................................................................................................................. 37
8.5.1. Recording live audio................................................................................................................................................................................................. 37
8.5.2. Recording a MIDI part........................................................................................................................................................................................... 37
8.5.3. Mixing and mastering ............................................................................................................................................................................................ 37
9. Specifications .............................................................................................................................................................. 38
9.1. Box Contents.......................................................................................................................................................................... 38
9.2. Hardware Specifications .............................................................................................................................................. 38
10. Declaration of Conformity............................................................................................................................... 40
11. Software License Agreement............................................................................................................................ 41

1. INTRODUCTION
Thank you for purchasing our compact audio interface, the MiniFuse 4. We at Arturia are
committed to delivering excellent products that satisfy the needs of modern musicians
and producers - we are confident that the MiniFuse 4 will be a perfect companion to any
computer-based music production and recording setup.
1.1. What Is an Audio Interface and Why Do I Need One ?
An audio interface is an outboard device that handles processing of audio input and
output. While all laptop and desktop computers these days come equipped with integrated
soundcards, in practice these are only meant for casual use and are, in most cases,
insufficient for the demanding tasks of audio production and recording. Our MiniFuse 4
is an affordable, professional-grade dedicated audio interface that offers the following
advantages over a typical onboard soundcard:
• Optimized for low-latency performance
• Microphone preamp(s) for crisp, present recording of vocals and instruments
• High-impedance input(s) to directly record your guitar or bass.
• Headphone and speaker system outputs for flexible monitoring
• Loopback recording for recording computer audio without any messy hardware
or software configurations.
• Direct Monitoring for monitoring your performance without any processing
latency.
1.2. MiniFuse 4 Features Overview
• 2 x combo Mic/Inst/Line XLR inputs with optional 48V phantom power
• 2 x 1/4" TRS balanced line inputs
• 4 x 1/4" TRS balanced line outputs
• 2 x 1/4" stereo headphone outputs
• 1 x 5-pin MIDI input
• 1 x 5-pin MIDI output
• 2 x USB2 type A hubs (low power)
• USB-C interface compatible with PC, Mac, fully USB 2.0 compatible
• Bus-powered
• Up to 192kHZ / 24bits recording and playback sample rate
• Loopback stereo input (at all sample rates)
2 Arturia - User Manual MiniFuse 4 - Introduction
2. CONNECTION DIAGRAM
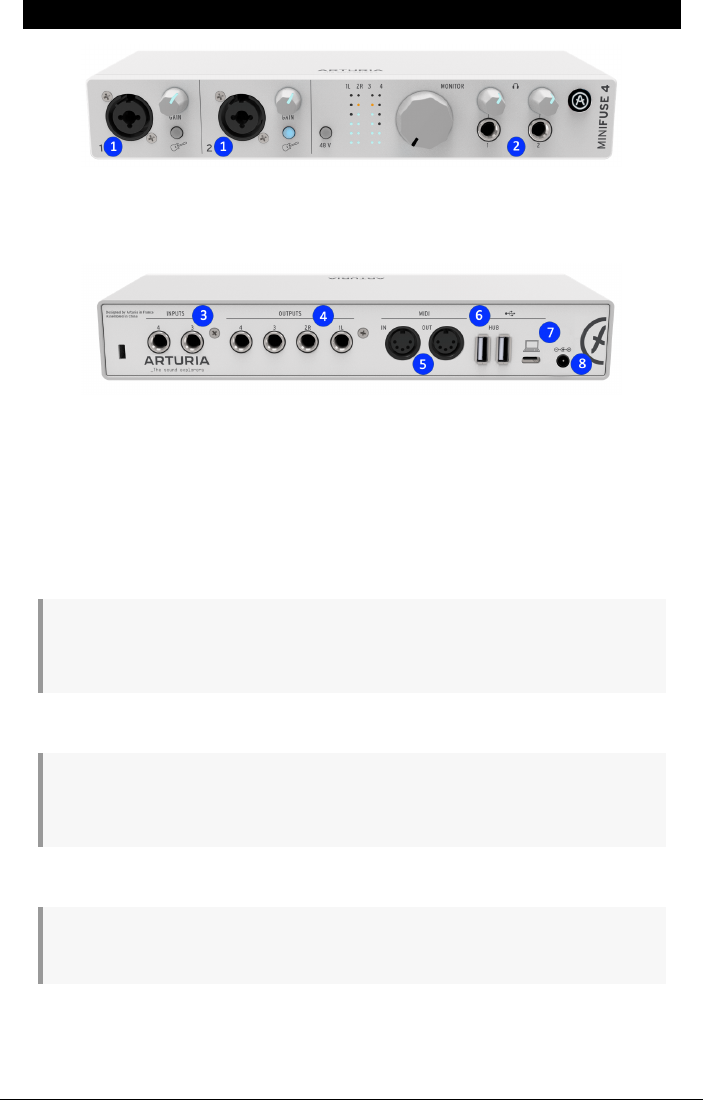
1 : Connect guitars/basses or other instruments to these XLR/TRS combo inputs.
2 : Connect headphones to these 1/4" outputs.
3 : Connect line-level audio sources, such as synthesizers and drum machines, to these TRS
inputs.
4 : Connect TRS outputs to powered speakers or mixers/amplifiers.
5 : Connect MIDI-compatible devices to these 5-pin MIDI input/output ports.
6 : Connect thumb drives, controllers or other USB devices (500mA maximum power) to
these USB ports.
To preserve bandwidth for all inputs and outputs, these USB ports will only function while the
MiniFuse is powered via the external power supply. The USB ports are disabled while the MiniFuse is
powered via USB.
7 : Connect the USB-C port to your computer.
We strongly recommend using the cable included with your interface to avoid any connectivity
issues. The included USB cable has been specially designed for the Arturia MiniFuse 4. We also advise
you to connect the MiniFuse 4 directly to your computer motherboard, and not through a USB hub.
8 : Connect the optional power supply to this port.
Power supply connection is needed if you intend to use the USB ports for connecting additional USB
devices.
Arturia - User Manual MiniFuse 4 - Connection Diagram 3
3. FRONT PANEL FEATURES
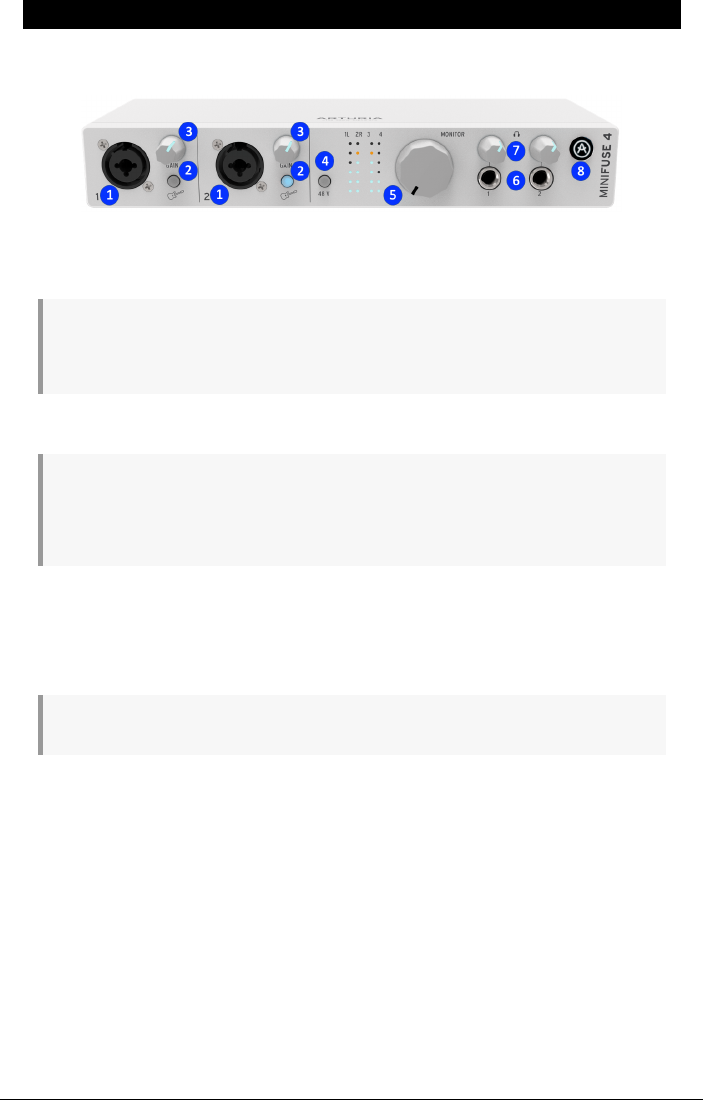
The front panel of the MiniFuse 4 provides access to most of the essential features on the
unit.
1. The combo jack for each input accepts two different kinds of connections - XLR and TRS
- allowing you to connect a variety of microphones and instruments into the MiniFuse.
For information on how to set up custom monitoring mixes, including direct monitoring of input
signals, please see the Creating Custom Mixes section of the MiniFuse Control Center [p.19] section of
this manual.
2. The Inst switch toggles the high-impedance circuit for the corresponding input.
When recording instruments with pickups, like guitar and bass, using the high-impedance setting
adjusts the internal circuit so that you can plug the instrument directly into the input without having
to first plug into an amp or a direct box. When using other types of inputs, like synthesizers or
microphones, leave this switch in the inactive position.
3. The Gain knob controls preamp gain of the corresponding input. Use it to adjust the
volume of the input to ensure that you are capturing a good signal without overloading. The
knob also features a LED indicator to help with setting input gain. When an instrument or
microphone source is detected, the LED will illuminate blue. If the input signal overloads, the
LED will illuminate red. If this happens, turn down the Gain knob.
High-resolution input metering is available through the MiniFuse Control Center [p.19] application.
4. 48V switch turns on phantom power for both inputs. Phantom power delivers a power
current to a connected microphone and may be required to get a good signal out of certain
types of microphones. Please read the following recommendations regarding when and
how to use phantom power:
• Only certain types of microphones, like condenser microphones, require
phantom power to function properly. Please check your microphone’s user
manual to determine which type it is.
• Phantom power may damage some equipment, like certain ribbon microphones.
Ensure that you are only using phantom power with microphones that require it.
• Do not connect or disconnect microphones while phantom power is turned on.
Turn off phantom power first, then connect or disconnect the microphone.
5. Monitor Volume knob controls the volume of Outputs 1 & 2 on the rear panel. Note that
the volume of Outputs 3 & 4 can only be controlled through the MiniFuse Control Center [p.19]
application.
4 Arturia - User Manual MiniFuse 4 - Front Panel Features

6. The 1/4” stereo headphone outputs can be used for connecting headphones. The
headphone outputs mirror the output pairs on the rear - Headphone 1 outputs the same
signal as Outputs 1 & 2, while Headphone 2 outputs the same signal as Outputs 3 & 4.
7. Headphone Volume knobs adjust the volume of the corresponding headphone output.
These knobs control the volume independently of the Outputs that they mirror.
Listening to loud music for prolonged durations through headphones can have a negative impact on
your hearing. When using headphones, we recommend taking frequent breaks to give your ears a rest
and avoiding high volumes for prolonged durations.
8. The Arturia switch is a multifunctional switch:
• Press and release quickly to open the MiniFuse Control Center [p.19] software
application, where you can access advanced features like high-resolution input
metering and custom mixes and routings. If the application is already running in
the background, pressing the switch will bring it to the foreground.
• Press and hold to put the interface in Sleep mode. While the device is in Sleep
mode, the MiniFuse Control Center application will be deactivated.
The Arturia switch will be illuminated white while the MiniFuse is powered via USB, and blue while it
is powered via the optional power supply.
Arturia - User Manual MiniFuse 4 - Front Panel Features 5
4. REAR PANEL FEATURES
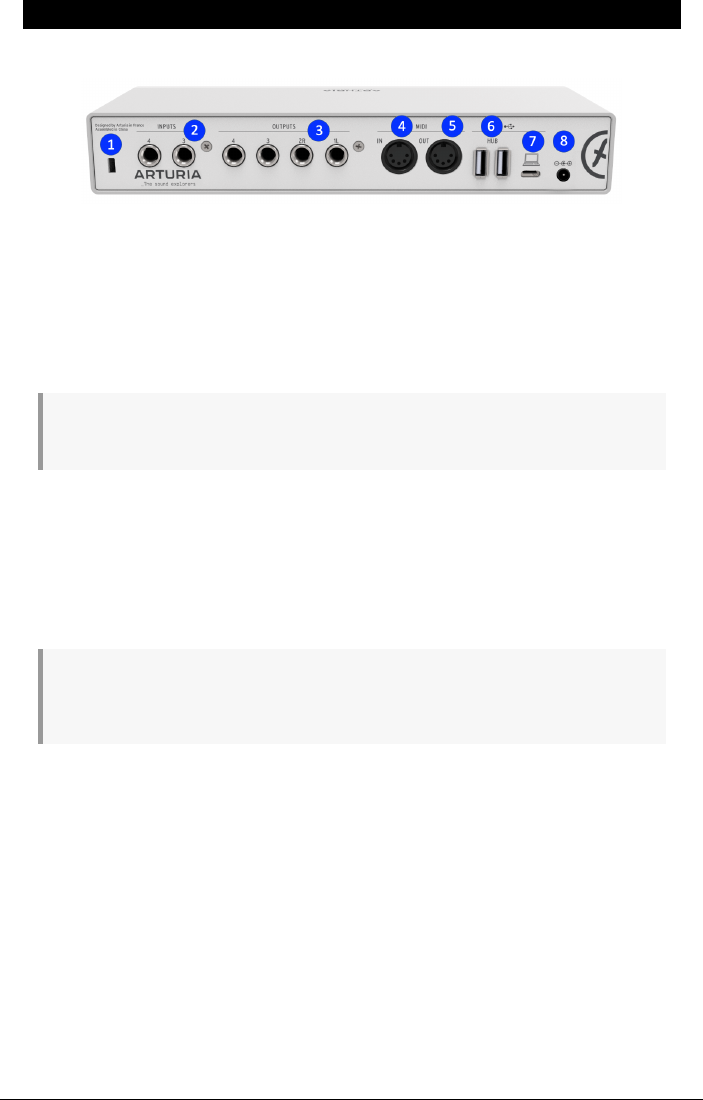
The rear panel of the MiniFuse 4 provides access to audio and MIDI connections.
1. Kensington lock - this optional security slot can be used for securing the interface using
a Kensington lock cable.
2. Inputs - these 1/4" balanced inputs can be used for connecting additional line-level
equipment, such as synthesizers and drum machines.
3. Outputs - these 1/4” balanced stereo outputs can be connected directly to active studio
speakers or other devices such as amplifiers and mixers.
Outputs 3 & 4 are DC-coupled and may be used for triggering and controlling equipment that
supports control voltage input.
4. MIDI In - connect MIDI devices to this port using a standard 5-pin MIDI cable. Devices
connected to this input can be used to trigger and control software instruments and effects.
5. MIDI Out - this output allows you to output MIDI data from your computer to control
other MIDI-compatible hardware devices.
6. Hub - these convenient USB ports allow you to plug in other USB devices, like thumb
drives or MIDI controllers.
The USB port is only functional while powering the MiniFuse via the optional power supply. It will not
function when the unit is bus-powered via USB only, in order to maintain sufficient bandwidth for the
inputs and outputs.
7. USB - connect the interface to your computer by plugging the supplied USB cable into
this port and your computer. This connection provides power to the interface and enables
communication between the interface and your computer.
8. AC power supply input - the MiniFuse can optionally be powered via the included power
supply instead of the bus-powered USB connection. To use the power supply, attach the
adapter for your specific region then plug it into a power outlet.
6 Arturia - User Manual MiniFuse 4 - Rear Panel Features
5. SETUP
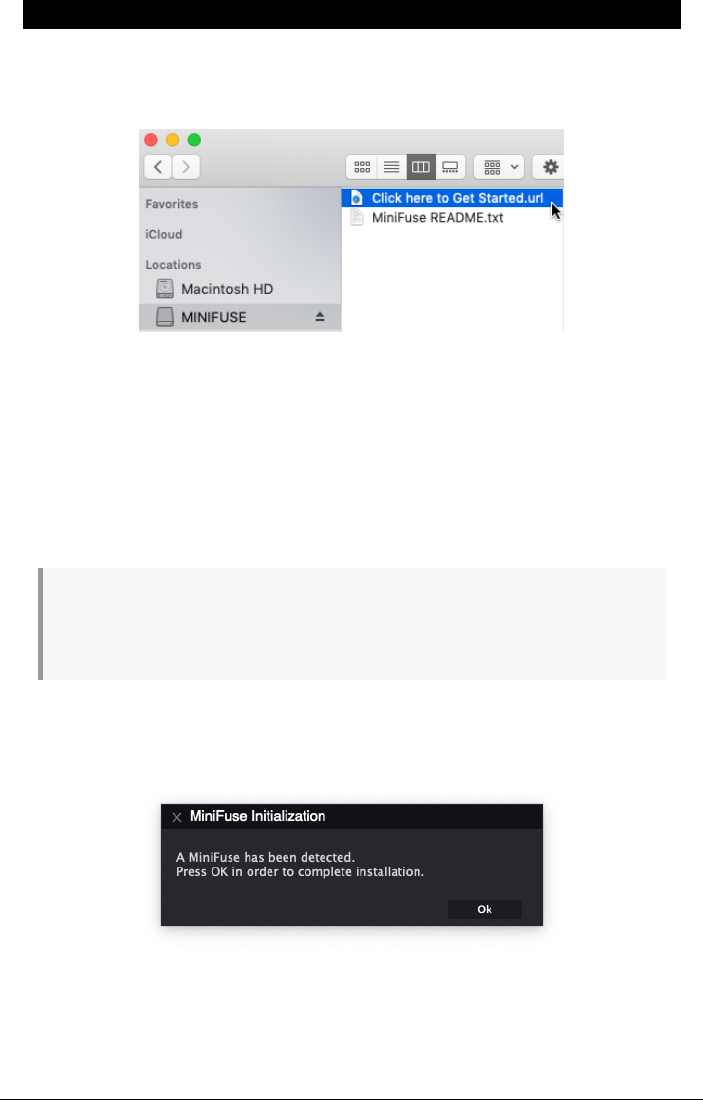
The first time you connect the MiniFuse 4 to your computer, it will appear as an external disk
drive.
Open the drive to access its contents, and double-click the Click here to Get Started link.
This link will open the MiniFuse registration page in your web browser. Follow the
instructions there to register your unit and download the MiniFuse Control Center [p.19]
application.
Benefits of registering:
• Free exclusive effects and instruments from Arturia, Ableton, and many more
• Access to tutorials, sound banks, and helpful content to get you started
• Regular free firmware updates
• Exclusive discounts on Arturia products as a registered user
While it is possible to use the MiniFuse 4 immediately without the MiniFuse Control Center
application, we highly recommend following the steps outlined in this section to initialize your MiniFuse
4 so that you can take advantage of all of its features. The MiniFuse Control Center installer includes the
MiniFuse ASIO driver for Windows, enabling the best performances from your MiniFuse.
Once you have downloaded and installed the MiniFuse Control Center application, double-
click to start it.
You will see the following pop-up window. Press Ok to complete the installation.
Congratulations, your MiniFuse 4 is now ready to use! For more information and support
online, you may visit www.arturia.com/support.
For more information on the features available in the MiniFuse Control Center application,
see the MiniFuse Control Center [p.19] section of this manual.
Arturia - User Manual MiniFuse 4 - Setup 7
5.1. Changing default system audio input and output
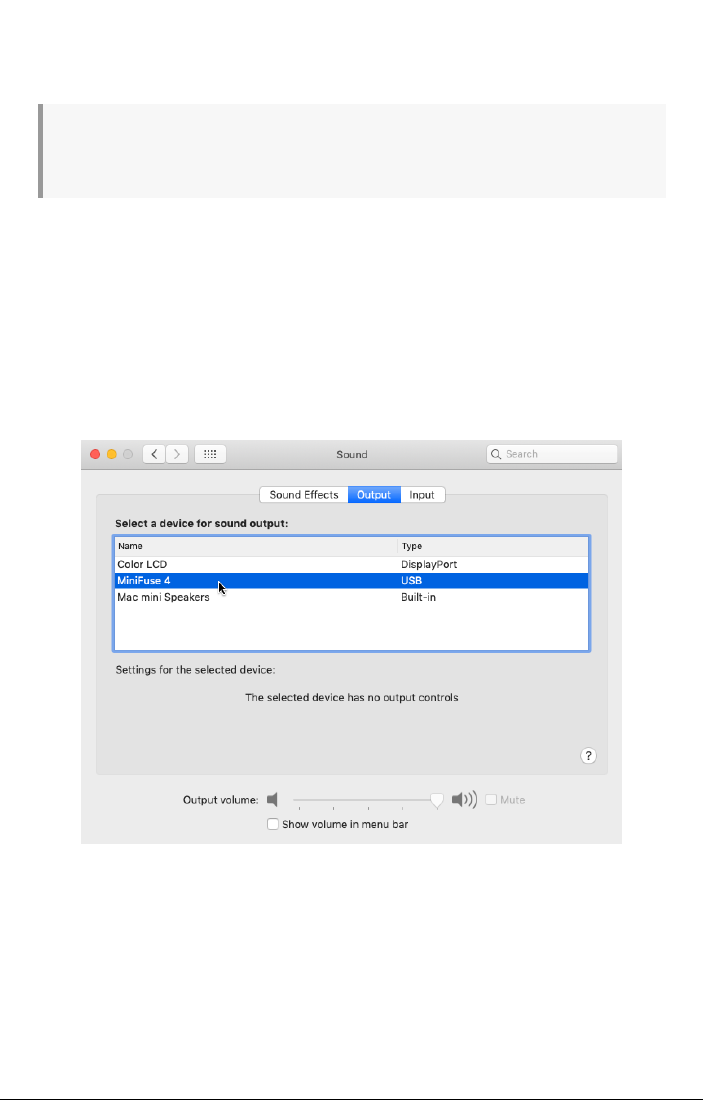
If you would like to use the MiniFuse 4 as your computer's default audio playback and
recording device, please follow the instructions below.
Most pro audio applications have their own audio preferences where you can select the MiniFuse 4
as the active audio device. If you intend to only use the MiniFuse for playback and recording with these
applications, it is not necessary to change the default system audio input and output.
5.1.1. MacOS
1. Navigate to your Applications folder.
2. Double-click System Preferences.
3. Click the Sound icon.
4. If you would like all computer audio - such as audio from web browsers and movie
players - to be played back through the MiniFuse 4, click the Output tab and select the
MiniFuse as the default output device.
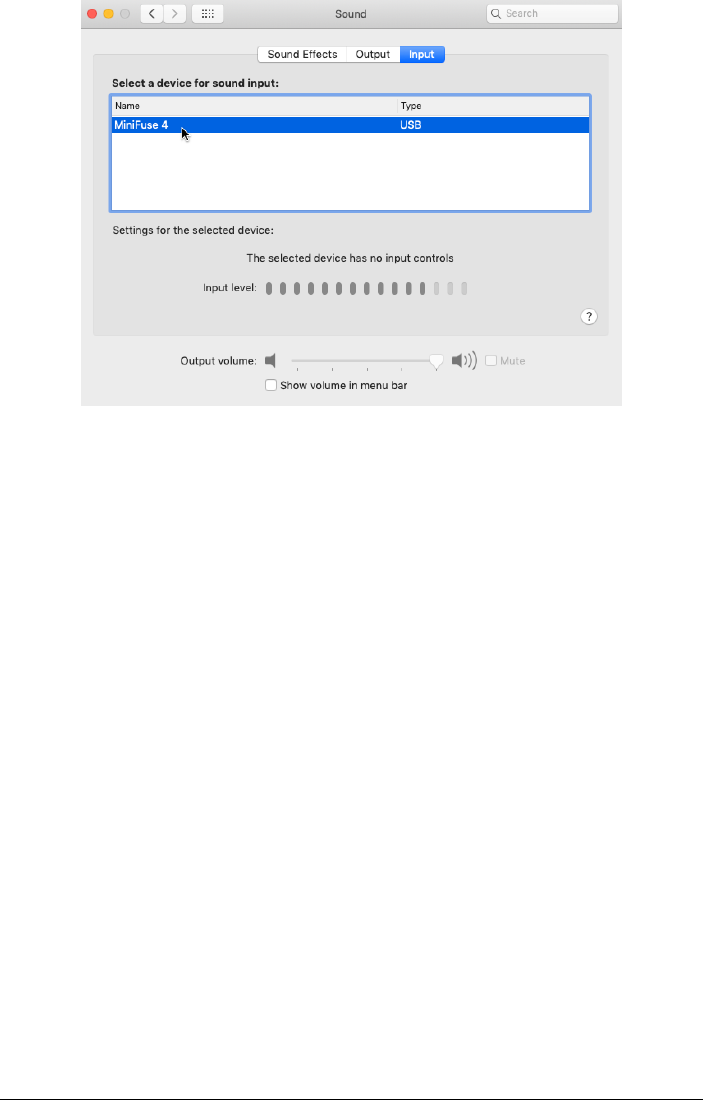
5. If you would like to use a microphone connected to the MiniFuse 4 as the default sound
input into your computer, click the Input tab and select the MiniFuse as the default input
device.
8 Arturia - User Manual MiniFuse 4 - Setup
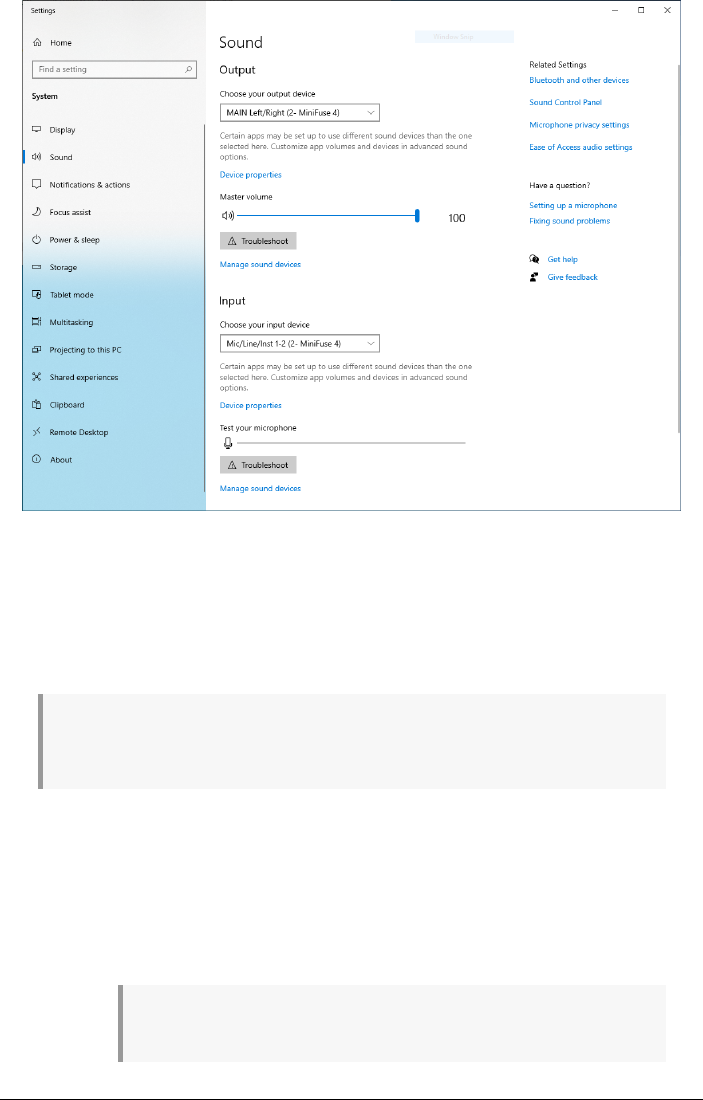
5.1.2. Windows
1. Navigate to Settings.
2. Click the Sound tab.
3. If you would like all computer audio - such as audio from browsers and movie
players - to be played back through the MiniFuse 4, choose "MAIN Left/Right
(MiniFuse 4) from the Output menu.
4. If you would like to use a microphone connected to the MiniFuse 4 as the default
sound input into your computer, choose the input channel from the Input menu.
Arturia - User Manual MiniFuse 4 - Setup 9
5.2. Using the MiniFuse 4 as an audio device with your
DAW
Most audio applications have their own audio settings, where you can select the active
audio device. Here we will show you how to configure the MiniFuse 4 with several audio
applications. The process will be similar in other audio applications.
Core Audio is a native Mac audio driver. All audio devices are built on top of this framework.
Windows contains several available audio protocols. ASIO is optimized for low-latency and high-fidelity.
We recommend using the ASIO driver provided by Arturia for best results.
Regardless of which application you use, you will usually find these two important controls
in the application's audio preferences:
• Buffer Size determines how quickly the computer will process audio data - the
smaller the buffer size the faster it will process audio, resulting in less latency at
the expense of higher CPU usage.
• Sample Rate specifies the sampling rate at which the MiniFuse 4 converts audio.
CD quality sample rate is 44,100Hz.
For more information on buffer size, sample rate, and their impact on latency, see the
A Quick Primer On Digital Audio [p.35] section of this manual.
10 Arturia - User Manual MiniFuse 4 - Setup
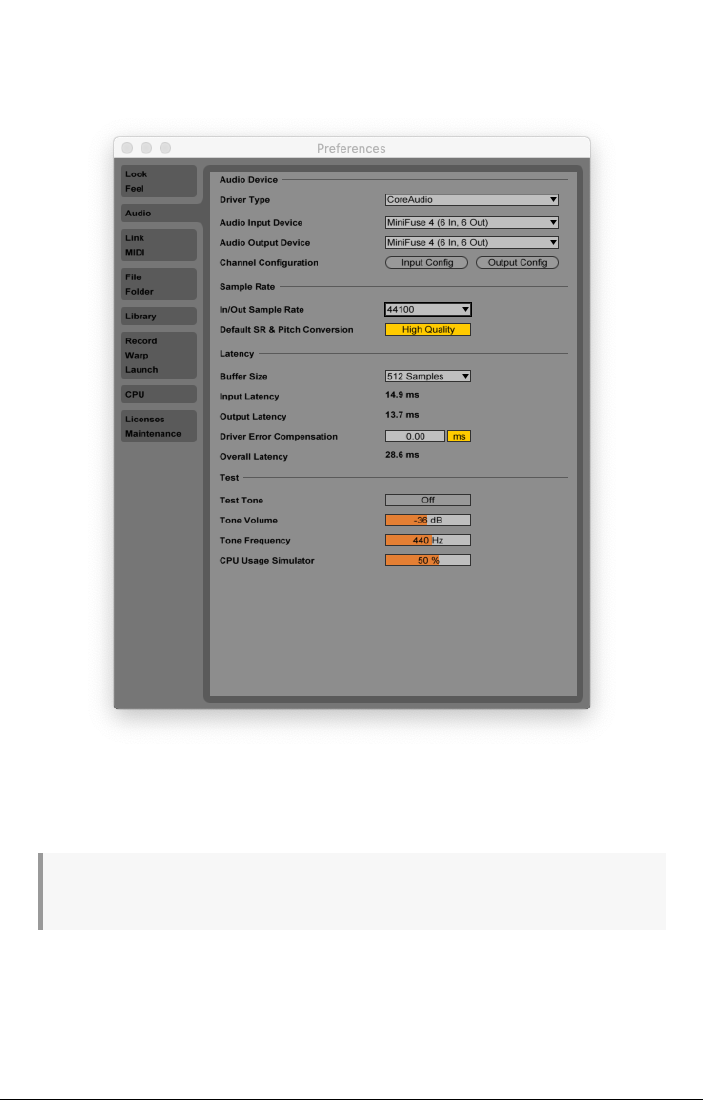
5.2.1. Configuring audio in Ableton Live
In Ableton Live, go to the Live menu and click Preferences.
In the Preferences window, click the Audio tab to access the audio device settings.
Select CoreAudio (MacOS) or ASIO (Windows) in the Driver Type menu.
Select the MiniFuse 4 in the Audio Input Device and Audio Output Device menus.
If you need to enable or disable specific input or output channels, you can click the Input Config or
Output Config buttons.
Arturia - User Manual MiniFuse 4 - Setup 11
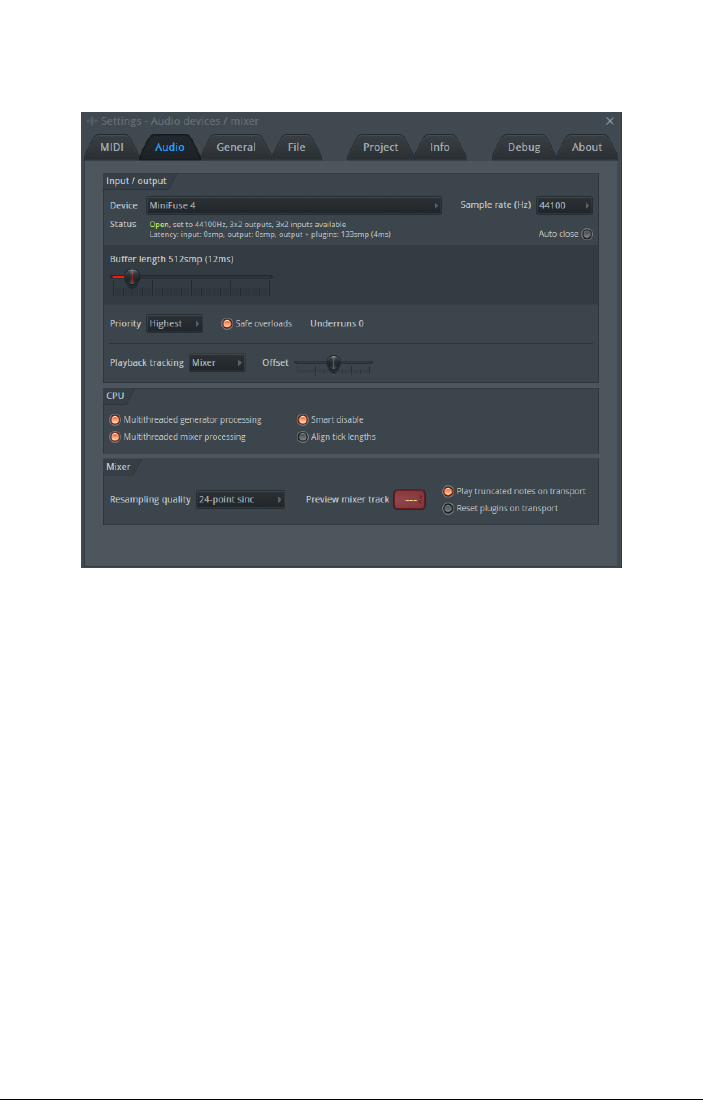
5.2.2. Configuring audio in FL Studio
In FL Studio, click the Options menu, then click Audio Settings.
In the Device menu select the MiniFuse.
12 Arturia - User Manual MiniFuse 4 - Setup
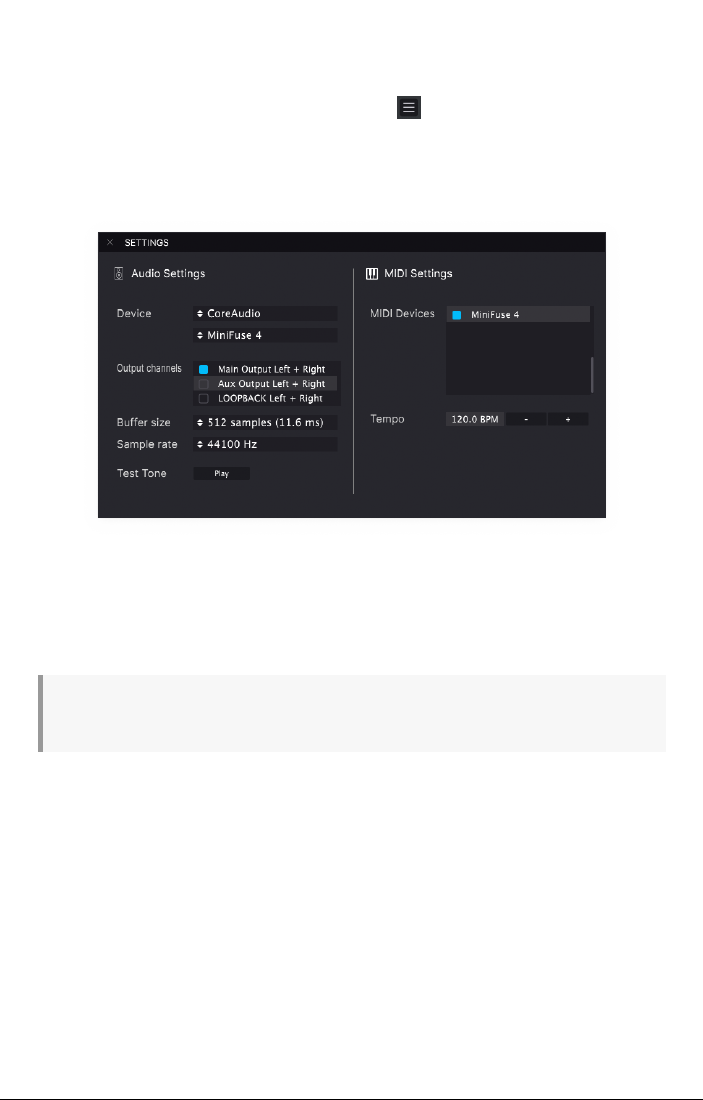
5.2.3. Configuring audio in Analog Lab
Our own Analog Lab software can work in standalone or plug-in mode. When using the
standalone application, follow these steps to configure it for use with the MiniFuse 4:
In Analog Lab, click the Menu button at the top left ( ), then click Audio MIDI Settings.
In the Audio MIDI Settings window, select CoreAudio (MacOS) or ASIO (Windows) in the
Device section.
In the menu below, select the MiniFuse 4.
In the Output Channels section select Main Output Left + Right; this is the main speaker
output from the MiniFuse.
You can press the Play button in the Test Tone section - you should hear a short tone played
back through the MiniFuse 4.
For more tips and in-depth information on how to configure various DAWs, please be sure to visit
the MiniFuse FAQ.
Arturia - User Manual MiniFuse 4 - Setup 13
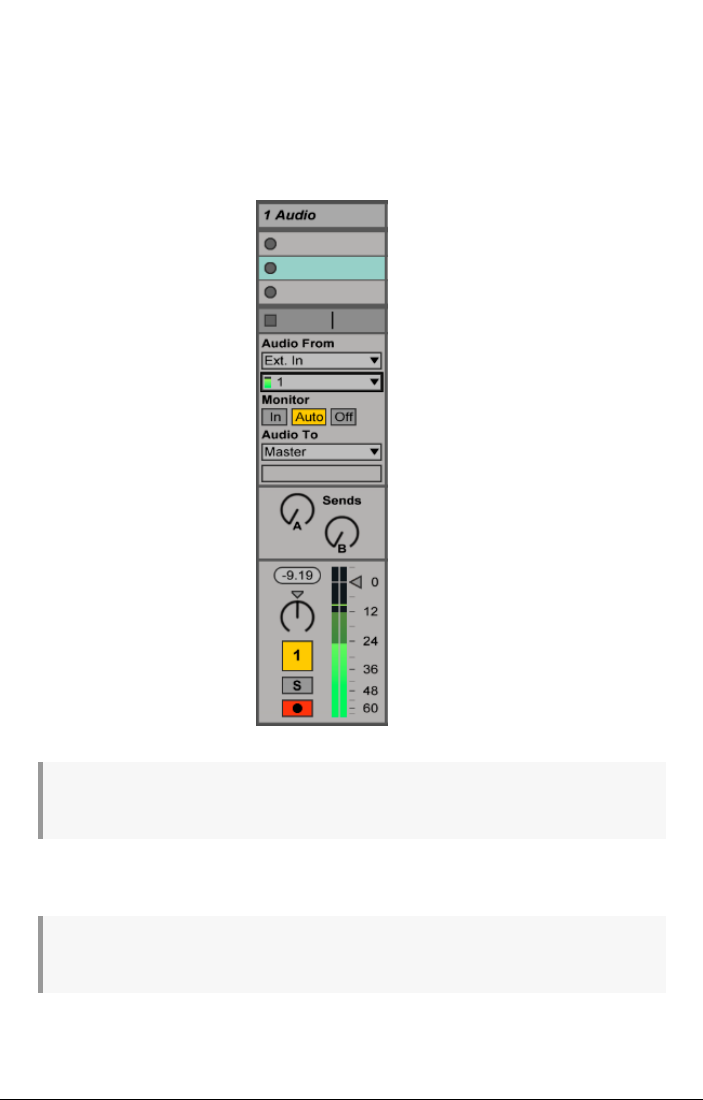
5.3. Recording audio into your DAW
Once your DAW has been configured to use the MiniFuse 4 as an input audio device, create
a new audio track where you would like to record your performance. Here we will show the
process in Ableton Live. It will be similar in other applications.
In the Audio From menu, select External Input.
In the menu below, select the input channel where you have connected the instrument or
microphone you would like to record.
If you would like to record a stereo sound source, like a synthesizer or drum machine, select a stereo
pair from the menu.
Press the Record Arm button on the track - you should now hear the audio input played back
through the computer.
If you do not wish to hear the input, you can turn off the Track Activator button, or change the
Monitor setting to Off.
Next, press the Record button in your DAW's transport and it will begin playing back the
arrangement and recording onto this track.
14 Arturia - User Manual MiniFuse 4 - Setup
5.4. Using the MiniFuse 4 as a MIDI device with your DAW
The MiniFuse 4 features standard 5-pin MIDI input and output ports on the rear panel that
can be used to connect MIDI-compatible devices to your computer.
While most MIDI controllers nowadays come with direct MIDI-over-USB connectivity, there are
devices like synthesizers and drum machines that only have standard 5-pin MIDI input and output
ports. These devices can be connected to your computer and integrated into your workflow through the
MiniFuse.
IMPORTANT: Note that MIDI input and output may only work once the MiniFuse Control
Center is installed on the computer. If you have not yet installed the MiniFuse Control Center,
you can access the installer by clicking the MiniFuse disk in your Finder / Explorer and
visiting the link contained inside.
You may need to enable the MiniFuse MIDI ports in your DAW to be able to use them. Here
we will show you how to do this in several audio applications. The process will be similar in
other audio applications.
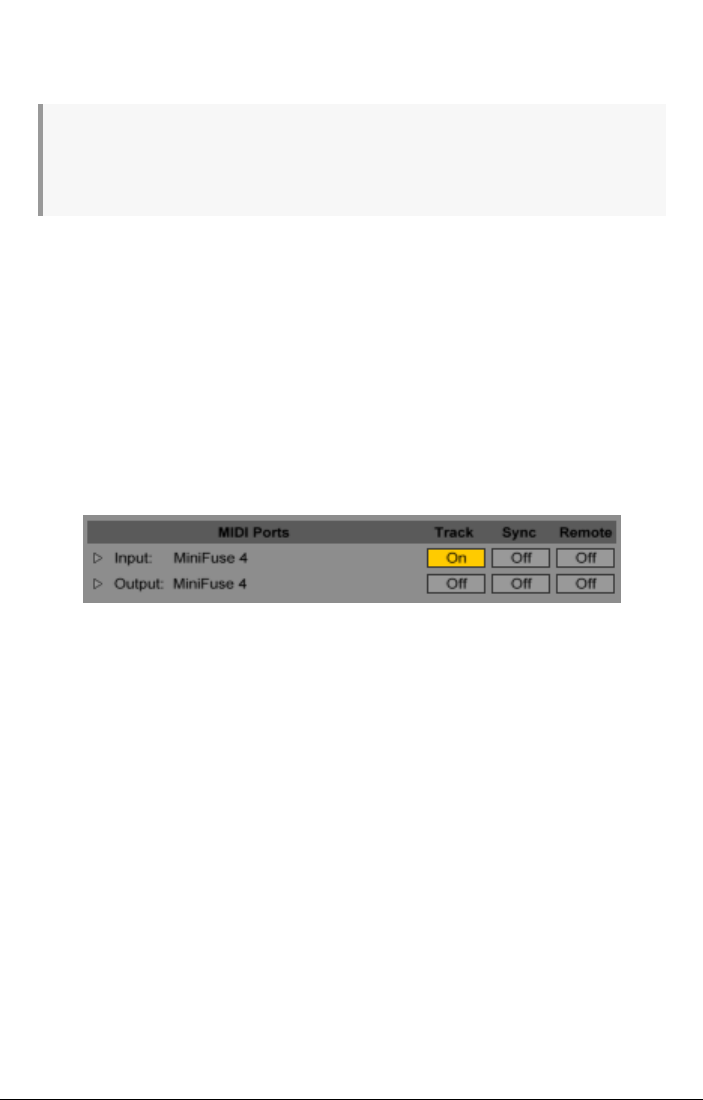
5.4.1. Configuring MIDI in Ableton Live
In Ableton Live, go to the Live menu and click Preferences.
In the Preferences window, click the Link MIDI tab to access the MIDI device settings.
The MiniFuse 4 should be listed in the MIDI ports section.
• To receive MIDI notes from the MIDI IN port on the MiniFuse 4, enable the Track
input.
• To transmit MIDI notes to the MIDI OUT port on the MiniFuse 4, enable the Track
output.
• To receive continuous control (CC) data from the MIDI IN port on the MiniFuse 4,
enable Remote input.
• To transmit continuous control (CC) data to the MIDI OUT port on the MiniFuse 4,
enable Remote output.
Arturia - User Manual MiniFuse 4 - Setup 15
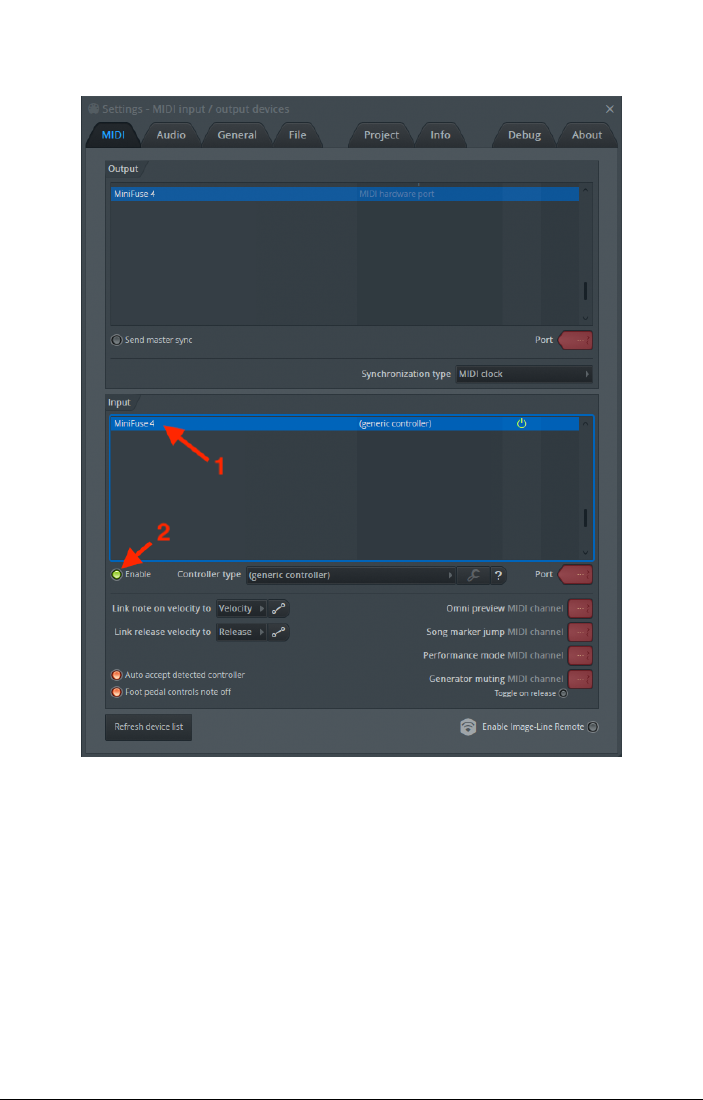
5.4.2. Configuring MIDI in FL Studio
In FL Studio, select the MiniFuse 4, then click the Enable button. You should now receive MIDI
signal from the MiniFuse into your DAW
16 Arturia - User Manual MiniFuse 4 - Setup
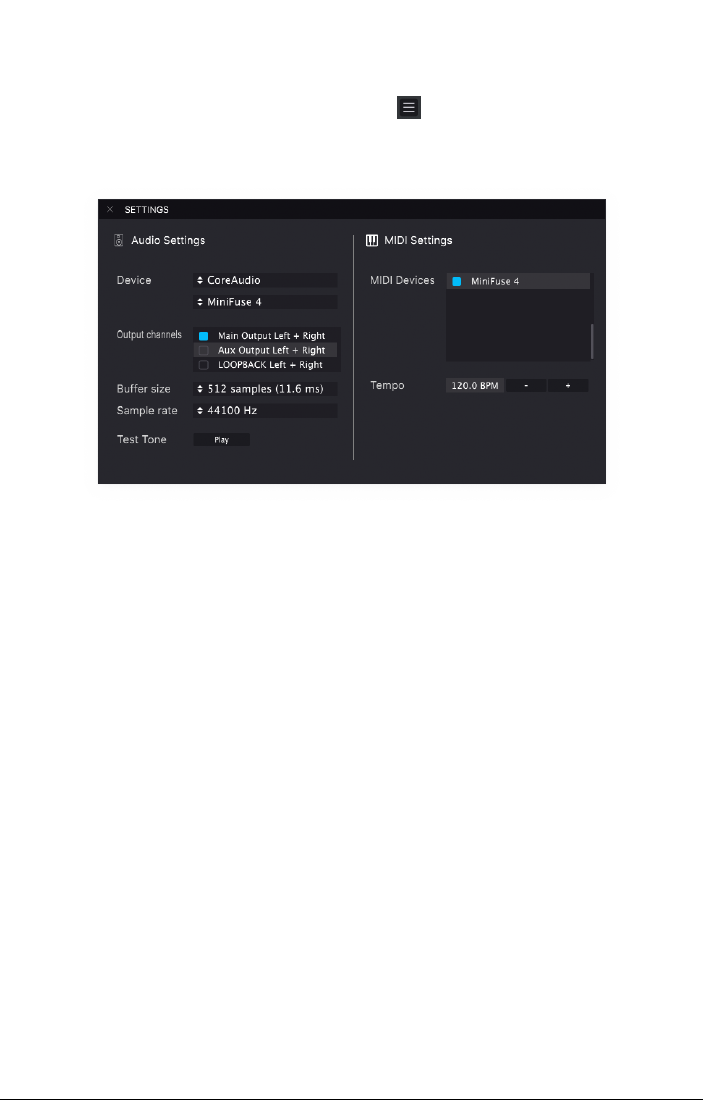
5.4.3. Configuring MIDI in Analog Lab
When using our Analog Lab software in standalone mode, you will need to enable the MIDI
ports you want to use:
In Analog Lab, click the Menu button at the top left ( ), then click Audio MIDI Settings.
In the MIDI Devices menu, enable MiniFuse 4. You should now receive MIDI signal in Analog
Lab.
Arturia - User Manual MiniFuse 4 - Setup 17
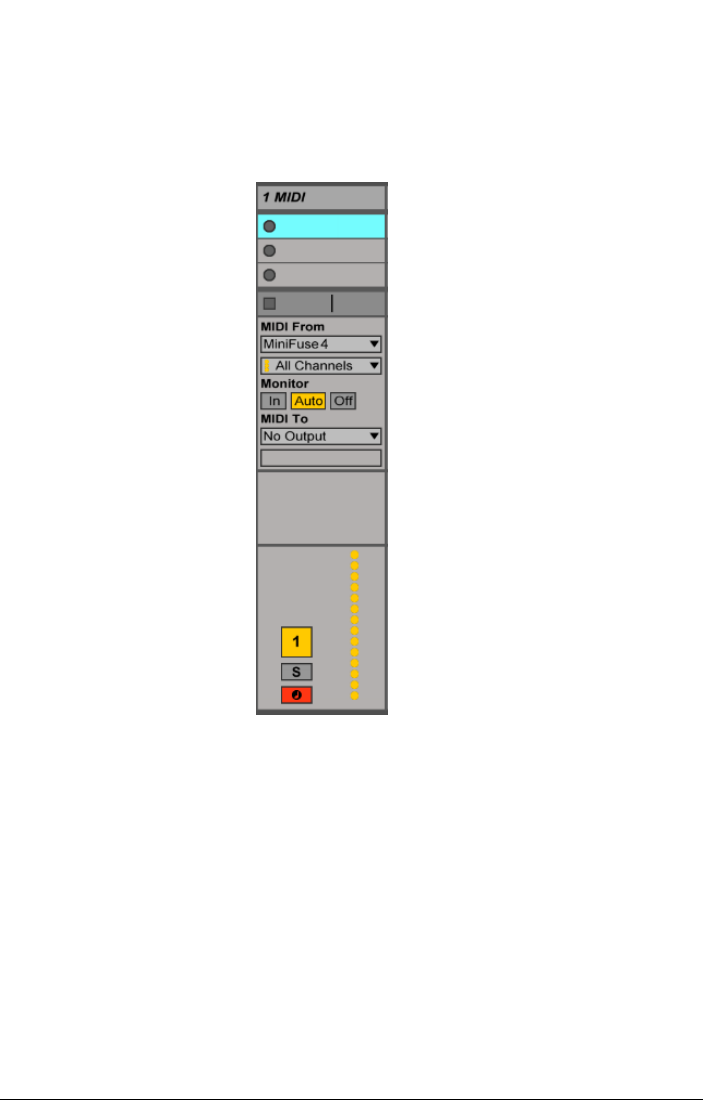
5.5. Recording MIDI from the MiniFuse 4 into your DAW
Once the MiniFuse 4 has been configured as a MIDI device in your DAW's settings, create a
new Instrument (MIDI) track.
Place a software instrument like a synthesizer or drum machine on this track.
In the MIDI From menu select the MiniFuse 4, or you can leave this menu to All Ins to
receive MIDI from all connected devices, including the MiniFuse.
Click the channel's Record Arm button. Now when you adjust controls or press pads or keys
on your connected MIDI device, you should see the MIDI activity bar light up to indicate that
this channel is receiving MIDI. Depending on the software device loaded onto the channel,
you should also hear sound being produced from it.
Next, press the Record button in your DAW's transport and it will begin recording your MIDI
performance onto this track.
18 Arturia - User Manual MiniFuse 4 - Setup
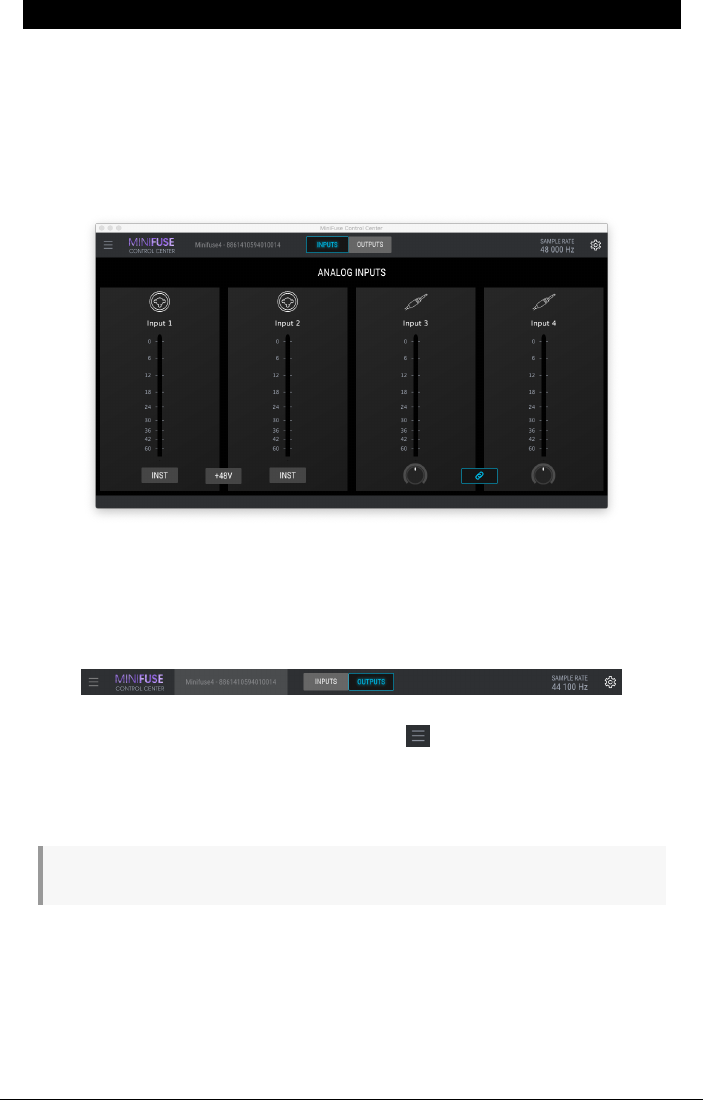
6. MINIFUSE CONTROL CENTER
Your MiniFuse 4 includes a control center application that provides access to many features
on the MiniFuse, as well as additional advanced features like Direct Monitoring and Custom
Monitoring Mixes.
The application can be found in:
• Mac: /Applications/Arturia/MiniFuse Control Center
• Windows: C:/Program Files (x86)/Arturia/MiniFuse Control Center
You can either start the application from your computer, or you can press the Arturia switch
on the front panel of the interface to bring up the application at any time.
6.1. Top Toolbar
Clicking the Main Menu icon in the upper left corner ( ) provides access to:
• Resize Window adjusts the size of the application for optimal viewing.
• Manual opens this user manual.
• About displays the software version and other information.
Window size can be adjusted via keyboard shortcuts Ctrl +/- on Windows and Cmd +/- on MacOS.
To the right of the application logo you can access the Device Selection. If several MiniFuse
devices are connected to your computer you can click this area and select a device to
access its settings.
The Inputs / Outputs tab selects what is displayed in the main section of the interface. We
will cover Inputs and Outputs features and controls later in this chapter.
Arturia - User Manual MiniFuse 4 - MiniFuse Control Center 19
Inputs / Outputs view can be toggled via the Tab key on your keyboard.
The Sample Rate displays the currently selected sample rate.
Sample rate can be changed in your host application or computer settings. It cannot be changed
from the MiniFuse Control Center.
The Gear button ( ) in the upper right displays additional preferences and firmware
update information. In the Preferences tab you can adjust the behavior of the high-
resolution meters and adjust the brightness of the LEDs on the front panel of the MiniFuse.
In the Firmware tab you can see the current firmware version and perform updates.
Firmware updates are an important way of offering you continued product support and new
features. We recommend checking for updates periodically to ensure that you are getting the most
optimal experience with your MiniFuse 4.
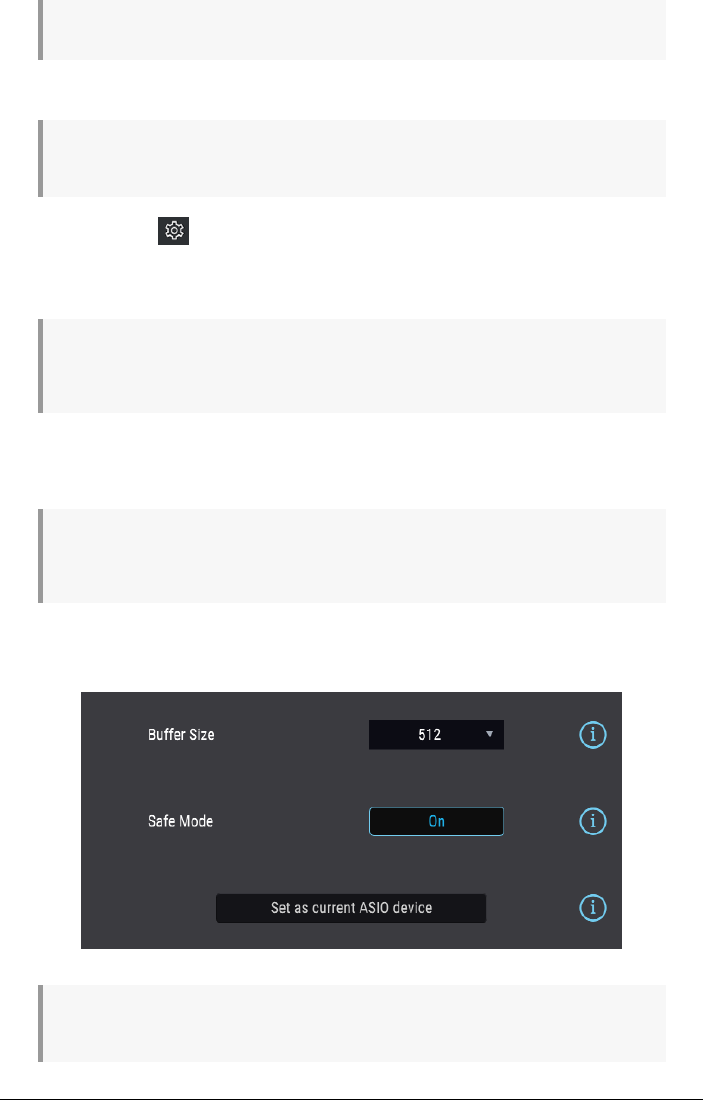
On Windows, there is an additional tab in the Gear panel - ASIO Preferences - here you can
select the Buffer Size to be used when running in ASIO mode, and enable or disable Safe
Mode.
In some cases, using a lot of processing in a DAW (e.g. effects or plugins), or setting low buffer sizes
on an older PC can cause the CPU load to be very high. A high CPU load can increase the risk for audio
dropouts (pops) to occur. In these cases, Safe Mode can be enabled to avoid the risk of audio dropouts.
When multiple MiniFuse interfaces are connected at the same time, you can set which
device will be used by the ASIO driver. From the top toolbar first select the MiniFuse you
would like to use as the default device, then click the Set As Current ASIO Device button.
ASIO is a Windows audio protocol that is optimized for low-latency and high-fidelity. We
recommend using the ASIO driver provided by Arturia for best results.
20 Arturia - User Manual MiniFuse 4 - MiniFuse Control Center
6.2. Input Features
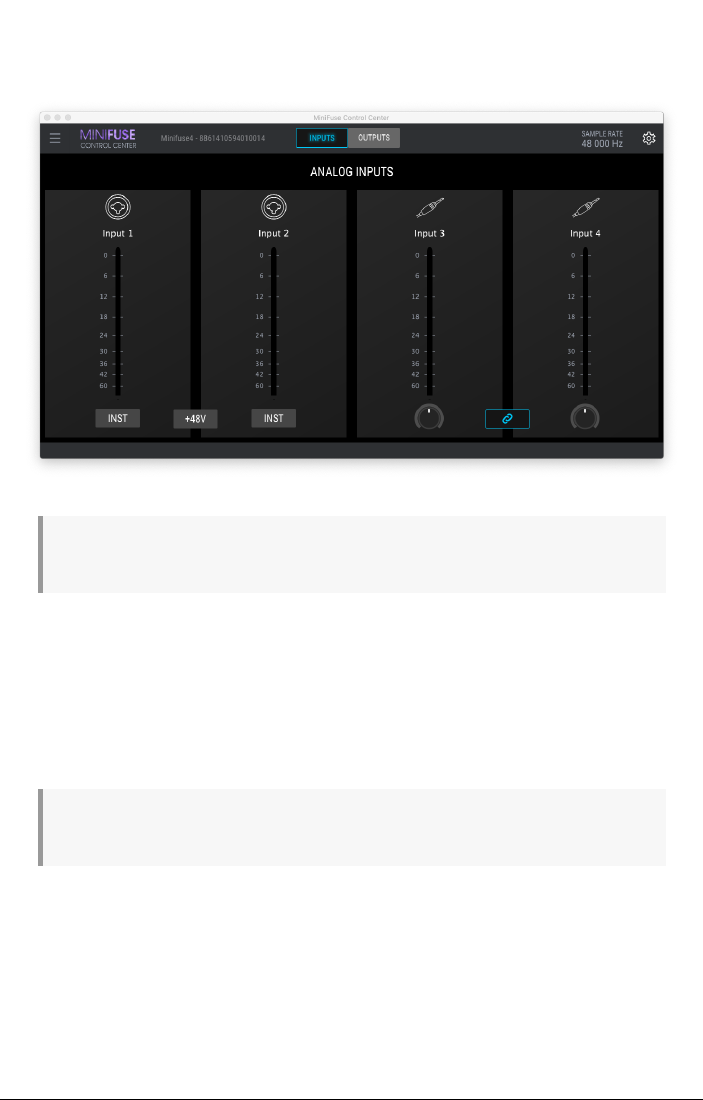
Clicking the Inputs button reveals various input features and controls, making it easy to
change settings directly from your computer without having to reach for the interface.
Any settings that you set in the MiniFuse Control Center application are stored in hardware memory
and will remain active even after closing the application.
For inputs 1 & 2:
Inst switch toggles the high-impedance circuit for the corresponding input. This setting
should be used when plugging instruments with pickups, like guitars and basses, directly
into the interface.
48V switch turns on phantom power for inputs 1 & 2. Phantom power delivers a power
current to a connected microphone and may be required to get a good signal out of certain
types of microphones.
For more information on the Inst and 48V features, please see the Front Panel Features [p.4] section
of this manual.
For inputs 3 & 4:
Trim knob adjusts the input level for the corresponding input.
Link button links the two trim knobs, so that the trim level is the same for both inputs. This is
useful when recording stereo sound sources.
Level Meters provide a high-resolution display of input levels for the corresponding input.
These can be useful when setting the Gain for the input. The meter features a Clip indicator
which lets you know if the input has been overloaded, or "clipped". Once the Clip indicator
has been activated, it will remain lit until you click to deactivate it.
Arturia - User Manual MiniFuse 4 - MiniFuse Control Center 21
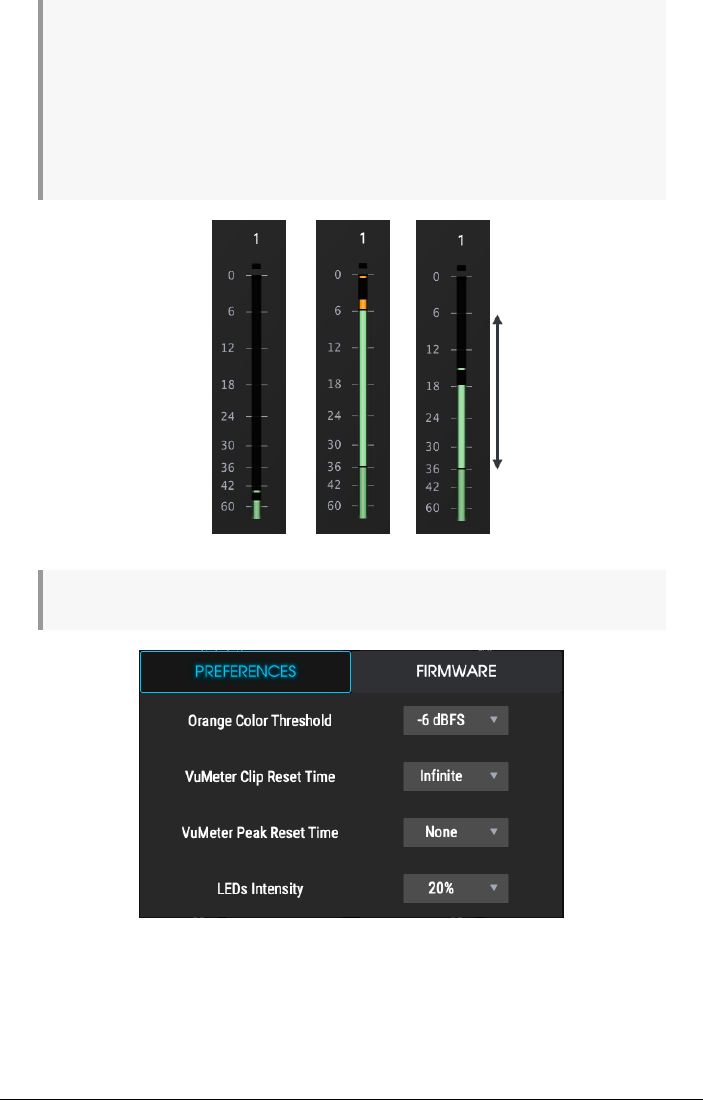
Be careful not to overload the inputs, as this will result in distorted recordings. Giving yourself plenty
of "headroom" will ensure that you don't distort the recording in loud parts of the performance. When
recording at higher bit depths like 24-bit, you do not need to push the input Gain very high. This is
because the noise floor at higher bit depths is much lower than that of 16-bit recordings, so turning up
a quieter high-bit depth recording after the fact will not add any noticeable noise to the mix. The light
green area of the meter, from -36dB to -6dB, is the optimal range we recommend for capturing a good
signal without clipping. See the 3 examples below - the one on the left is too quiet, while the example in
the middle is too loud and may result in distorted recording. The example on the right shows the ideal
volume range to ensure crisp and clean recordings with lots of detail.
Behavior of the high-resolution meters can be adjusted in the Gear / Preferences window.
The following settings allow you to customize the vu meter display:
• Orange Color Threshold determines the volume above which the meter color will
turn orange.
22 Arturia - User Manual MiniFuse 4 - MiniFuse Control Center
• VuMeter Clip Reset Time specifies how the red clip indicator resets after clipping
has occured. On the Infinite setting, the clip indicator will remain lit until you click
to turn it off.
• VuMeter Peak Reset Time determines the behavior of the yellow peak indicator.
The peak indicator can be configured to reset after a certain amount of time, hold
at the highest peak value (Infinite setting), or to reset instantly (None setting)
• LEDs Intensity allows you to adjust the brightness of the LEDs on the MiniFuse to
suit your preference.
6.3. Output Features
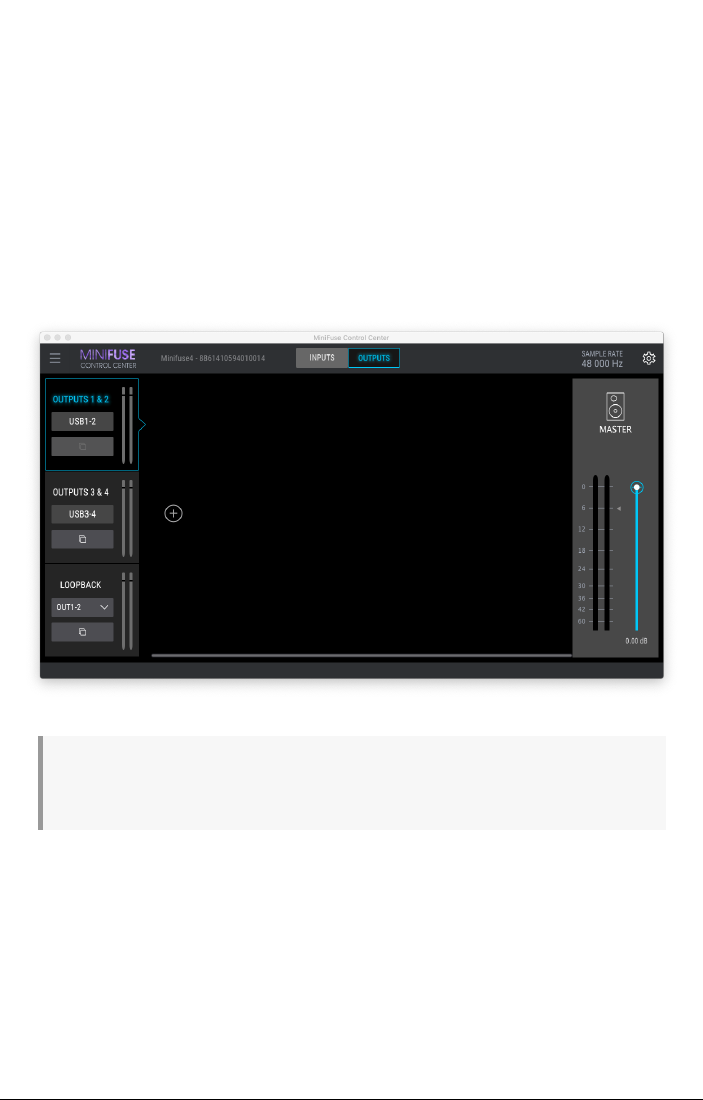
Clicking the Outputs button provides access to a flexible mixing and routing environment.
Here you can create custom mixes of various computer and input sources, including direct
monitoring of input signals.
Any settings that you set in the MiniFuse Control Center application are stored in hardware memory
and will remain active even after closing the application. On top of that, even if the MiniFuse 4 is not
plugged into a computer, the parameters you have set into the MFCC are saved.
There are three 3 tabs on the left, corresponding to the 3 pairs of outputs on the MiniFuse 4
- two pairs of physical outputs, and a virtual output pair for loopback recording.
Click on a tab header to view the mix settings associated with the corresponding outputs.
For Outputs 1 & 2 and Outputs 3 & 4 you have two options:
1. Enable the corresponding USB button to output audio from these software channels
directly. For example, channels 1/2 from your DAW will be directly routed to outputs 1/2 on
the MiniFuse.
Arturia - User Manual MiniFuse 4 - MiniFuse Control Center 23
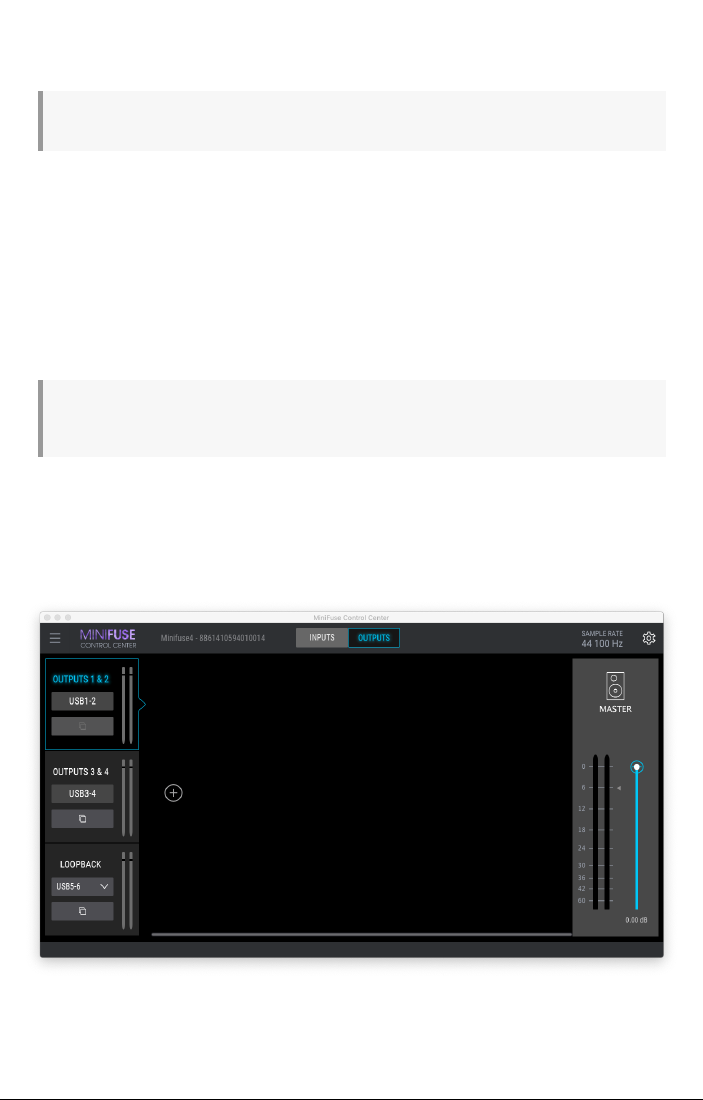
2. Disable the USB button to create a custom mix that will be output on these channels
from the MiniFuse. Custom mixes can include various combinations of computer and input
sources, with additional panning and volume controls. We will explain how to create custom
mixes below.
Headphone Output 1 mirrors Outputs 1 & 2, while Headphone Output 2 mirrors Outputs 3 & 4.
Unlike the two output pairs above, the Loopback channel is a special channel that is only
used for routing audio internally. This allows you to record audio from other applications on
your computer without the need for additional cables. For more information on Loopback
Recording, please see the Loopback Recording [p.28] section of this manual. Instead of a
button, the Loopback channel has a pull-down menu that lets you select its behavior:
• USB 5-6 routes channels 5/6 from your software directly into the Loopback input.
• Cue2Mix allows you to create a custom mix of computer and input sources.
• OUT 1-2 routes audio from the Outputs 1 & 2 channel into the Loopback input. *
• OUT 3-4 routes audio from the Outputs 1 & 2 channel into the Loopback input. *
* Note that any mixing adjustments, like muting and panning, that you do on the Outputs channels
will be reflected in the Loopback input when using these OUT options.
6.3.1. Creating Custom Mixes
• To create a custom mix for a MiniFuse output pair, first ensure that the USB
button on the corresponding tab on the left is deactivated, or the CueMix option
is selected if using the Loopback channel.
24 Arturia - User Manual MiniFuse 4 - MiniFuse Control Center
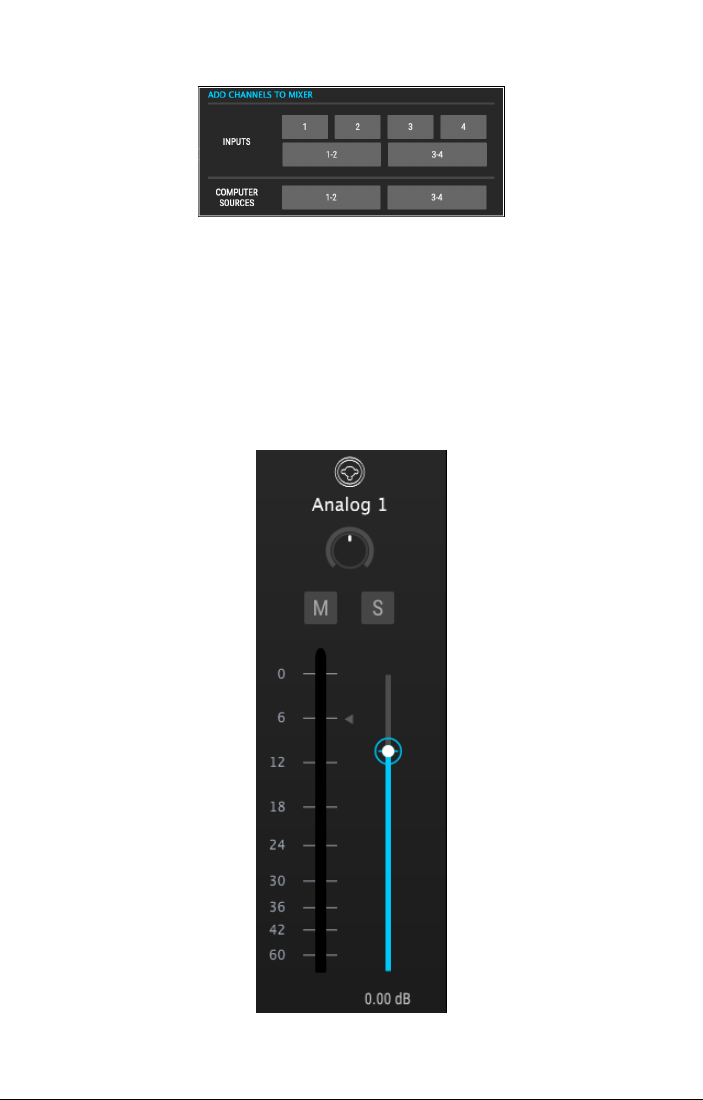
• To add sources to a custom mix, click the + button. You will see a pop up where
you can select input and computer sources. You may choose mono or stereo
input sources. Click to add the source to the mixer, then click away to return to
the mixer view.
• To remove sources from a custom mix, click the x button located on the top
right of the channel you'd like to remove, or deselect the source from the Add
Channels window.
Each channel has the following controls:
• Pan knob sets the position of the signal in the stereo field.
• Mute button mutes the channel.
• Solo button solos the channel, muting all other channels in the mix.
• Volume fader sets the volume of the channel.
Arturia - User Manual MiniFuse 4 - MiniFuse Control Center 25
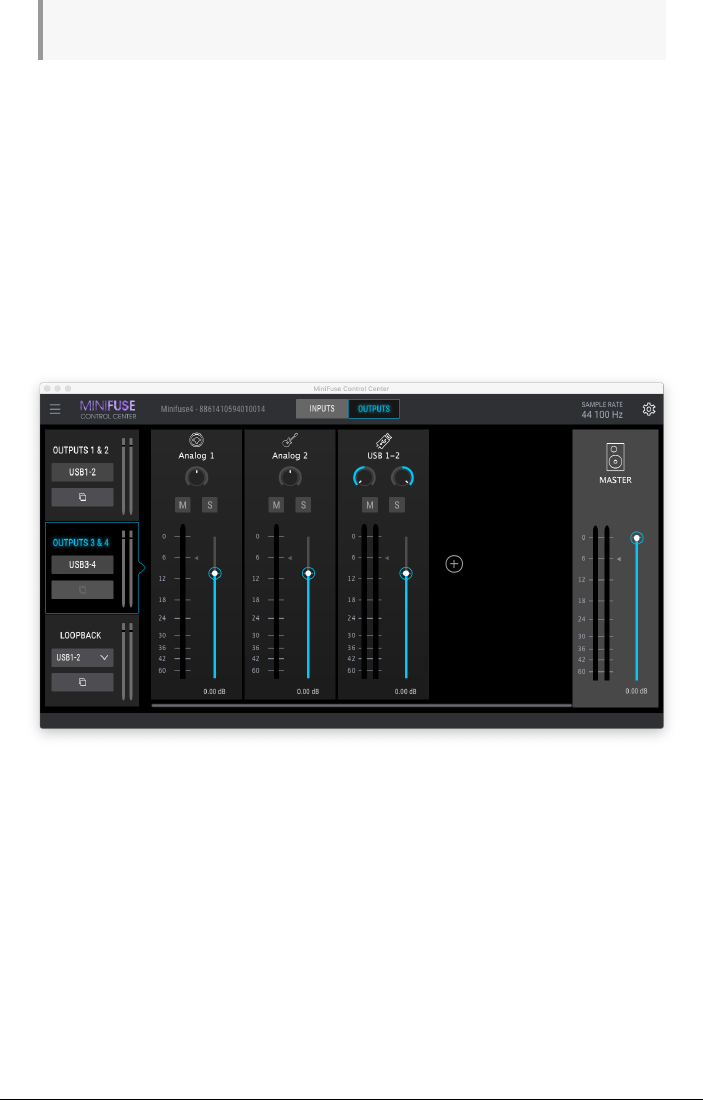
To reset a control, double-click on the fader to return to its default value.
Each custom mix also has a Master Volume fader on the right that can be used adjust the
overall volume of the mix.
6.3.1.1. Direct Monitoring
Recording live instruments on a computer can sometimes present challenges, depending
on your computer configuration and CPU load. Since your computer processes incoming
and outgoing audio in buffer “chunks”, this can result in delayed playback of the input
signal, which can create distracting echoes that could throw off a performance. To avoid
this latency, the MiniFuse 4 gives you the option of using Direct Monitoring.
To use Direct Monitoring, add any input source to a custom mix. When added to a custom
mix, input sources are also routed directly to the outputs without incurring any latency that
may occur when those inputs are routed and monitored through your DAW.
Let's take a look at a practical example. In this example, a singer / guitar-player would like
to record themselves playing to pre-arranged drum parts in their DAW. They would like to
hear both their performance and the computer audio in their headphones.
For this situation we can create a custom mix on Outputs 3 & 4. This mix will be send out of
Outputs 3 & 4 on the MiniFuse, as well as Headphone 2 which mirrors this output pair.
We've added 3 channels to the mix:
• 1 microphone input
• 1 guitar input
• audio playback from the computer (output channels 1-2 from the DAW)
26 Arturia - User Manual MiniFuse 4 - MiniFuse Control Center
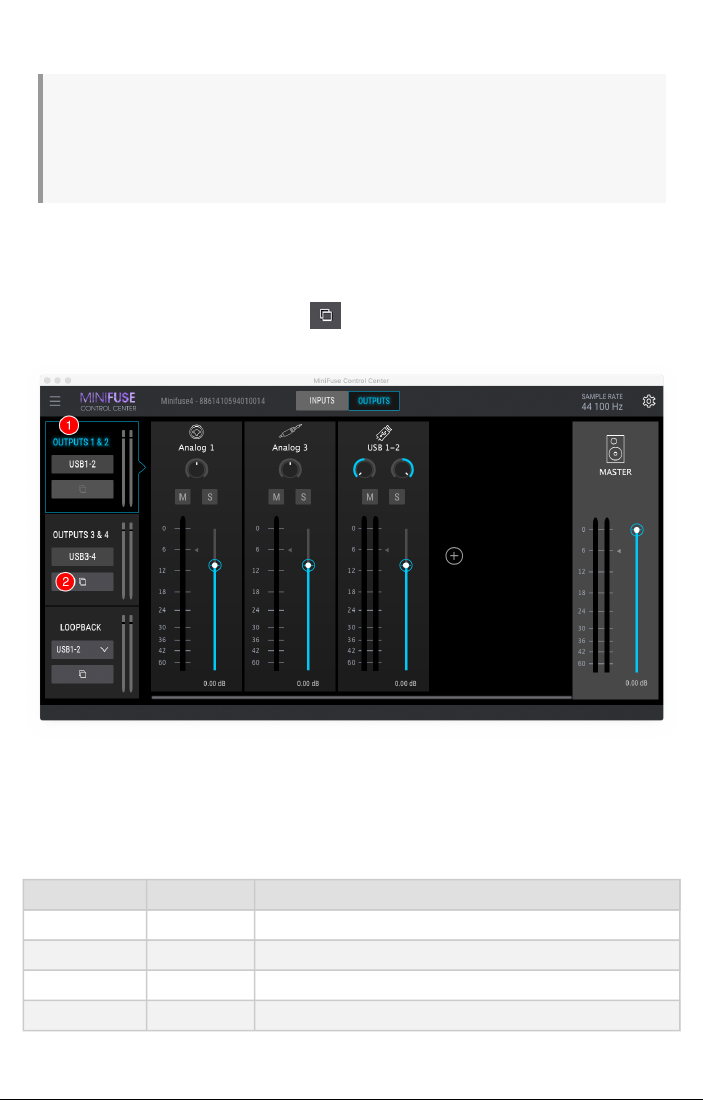
In this configuration, the microphone and guitar inputs will be monitored directly so that the
musician can hear their performance alongside the backing tracks without any software
latency.
Custom mixes can be very useful for creating specialized feeds to headphones. For example, if
you are recording two musicians each may want to have a different mix going to their headphones
- perhaps the singer wants less guitars, or the guitar player only wants to hear the drums that have
already been recorded in the DAW. The MiniFuse Control Center app makes it easy to create different
mix configurations to suit your project.
6.3.1.2. Copying Mix Settings
To copy a custom mix and its settings, first select the channel whose settings you would like
to copy. Second, click the Copy button ( ) on the channel where you would like to copy
settings to.
6.3.1.3. Keyboard Shortcuts
There are several keyboard shortcuts to provide quick access to various application views:
Windows MacOS Description
Ctrl + Cmd + Increases window size
Ctrl - Cmd - Decreases window size
Tab Tab Switches between Input and Output views
Ctrl Tab Ctrl Tab Switches between custom mixes
Arturia - User Manual MiniFuse 4 - MiniFuse Control Center 27
7. LOOPBACK RECORDING FEATURE
The MiniFuse Loopback Recording feature allows you to record any audio playing on
your computer directly into your recording application, without the need for complicated
software workarounds or additional cables. Loopback Recording uses a pair of virtual inputs
on the MiniFuse into which you can "plug" any computer audio, vastly expanding the types
of sound sources available for recording into your projects.
Windows: Note that the included MiniFuse ASIO driver needs to be installed and selected in order to
use the Loopback feature. For more information please refer to the FAQ web page.
7.1. Routing computer audio to the Loopback output/input
There are two different options available to you, depending on your system and software:
• Record all computer audio - all applications playing audio will be recorded. This
is usually used to record audio from applications like web browsers and movie
players.
• Record audio from specific applications - selectively choose which applications
get recorded. This depends on whether your application allows you to route its
output to a specific destination.
Next, we'll walk you through the steps of setting up each recording scenario.
7.1.1. Recording all computer audio
To record all audio playing from your computer, you will need to change the default system
audio output so that it is routed to the MiniFuse's internal Loopback input.
7.1.1.1. Change system audio output on Mac
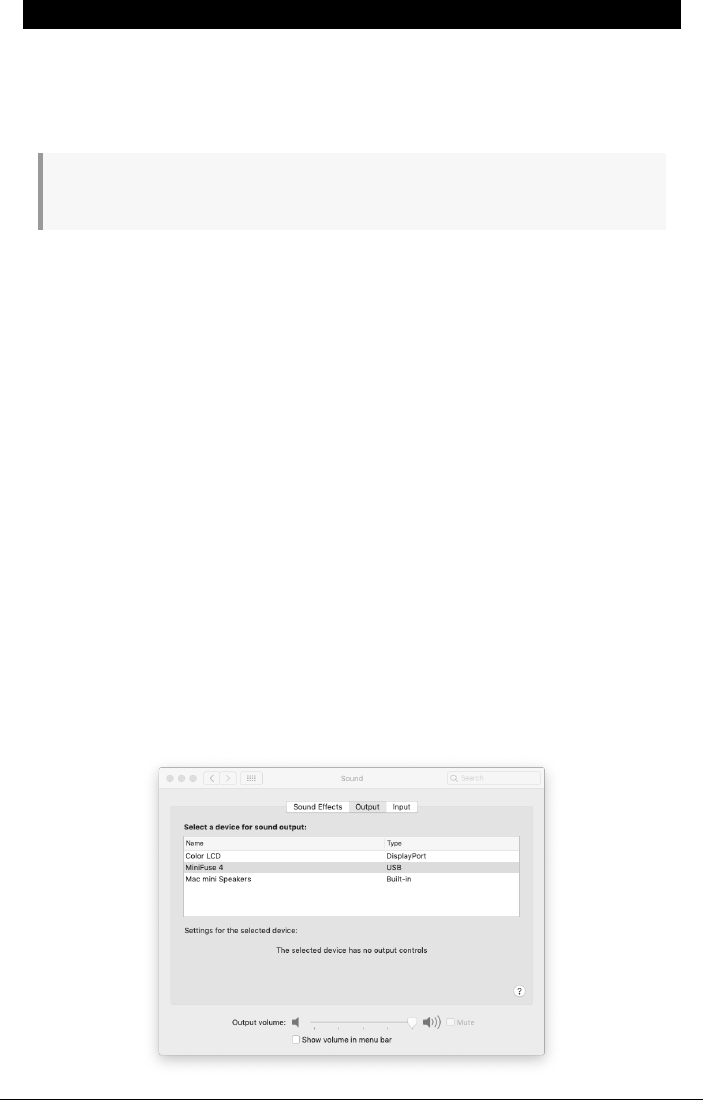
1. Go to the Applications folder and open System Preferences.
2. Click Sound and ensure that "MiniFuse 4" is selected in the Output tab.
28 Arturia - User Manual MiniFuse 4 - Loopback Recording Feature
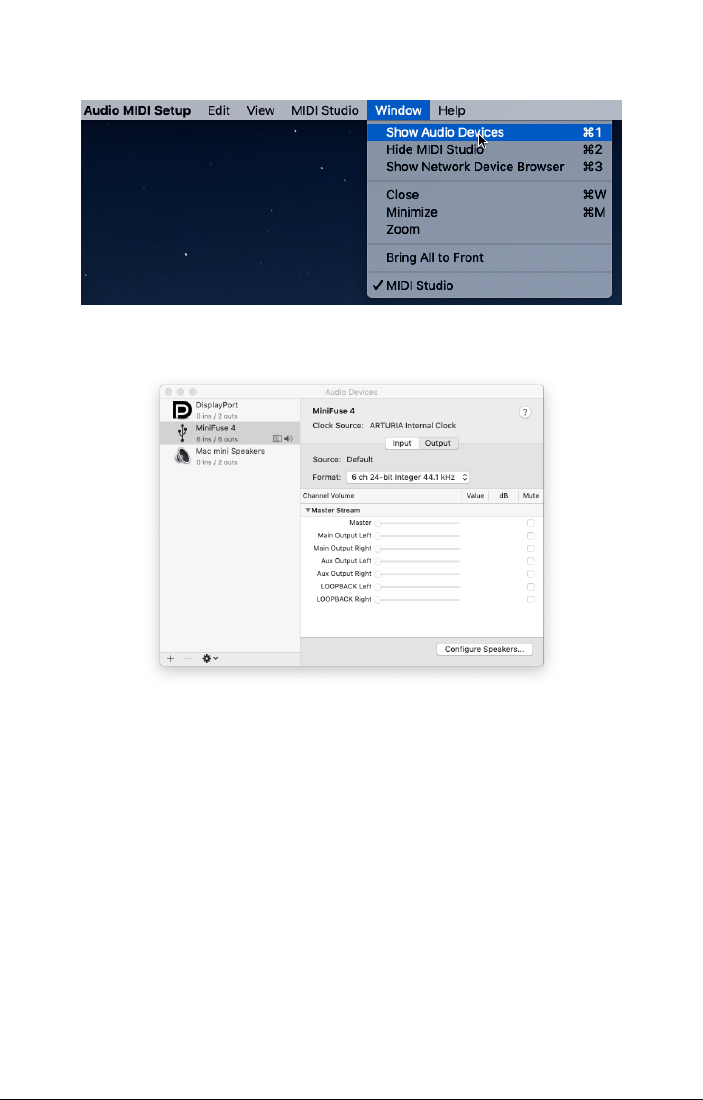
3. Next, go back to the Application folder and open the Utilities folder.
4. Open the Audio MIDI Setup application.
5. In the Window menu, select Show Audio Devices.
6. Click the MiniFuse 4 in the left panel, then click Configure Speakers.
7. Now click the menu for the "Left front" speaker, and change its setting to "Loopback Left".
Arturia - User Manual MiniFuse 4 - Loopback Recording Feature 29
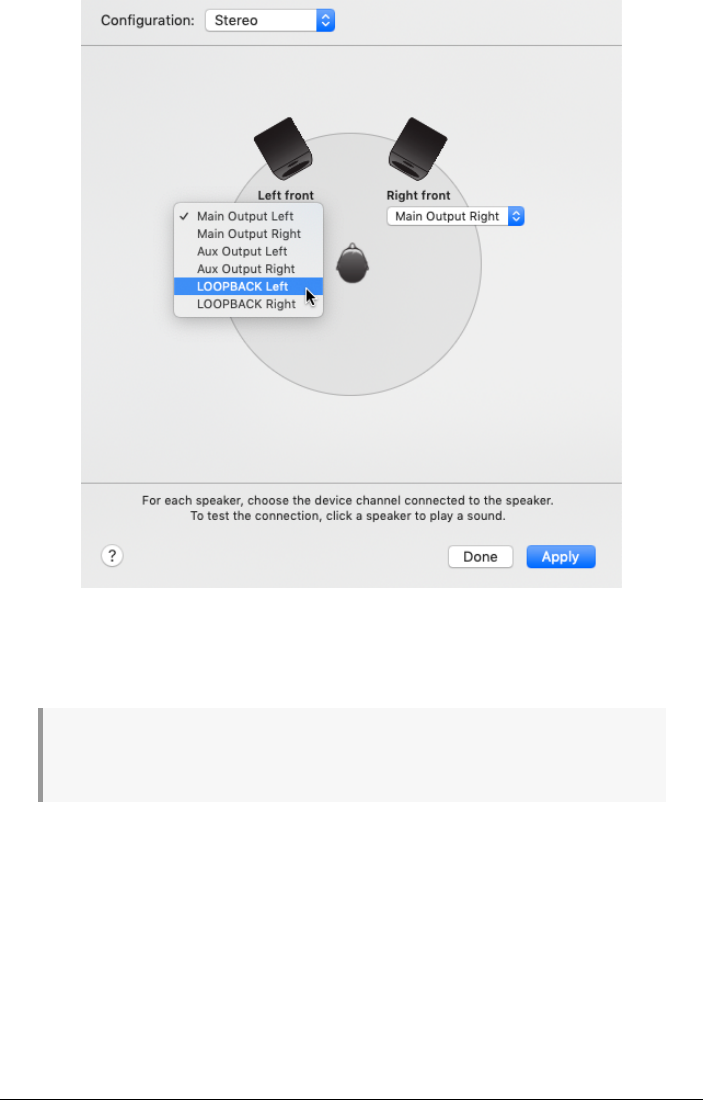
8. Repeat step 7, this time for the "Right front" speaker.
9. Your computer will now play all audio through the Loopback input on the MiniFuse,
allowing you to record it into your recording application.
Once you change your system output to use the Loopback output, you will not be able to hear any
computer audio until you a) record-enable a channel in your recording application, or b) switch the
output back to "Main Left/Right" inside the Configure Speakers panel in Audio MIDI Setup.
7.1.1.2. Change system audio output on Windows
1. In the Windows taskbar, click the Speaker icon, then click the arrow to expand the view.
2. You will see a menu of available outputs. By default this will be set to "MAIN Left/
Right", which will route any computer audio through the speaker outputs on the rear of the
MiniFuse.
30 Arturia - User Manual MiniFuse 4 - Loopback Recording Feature
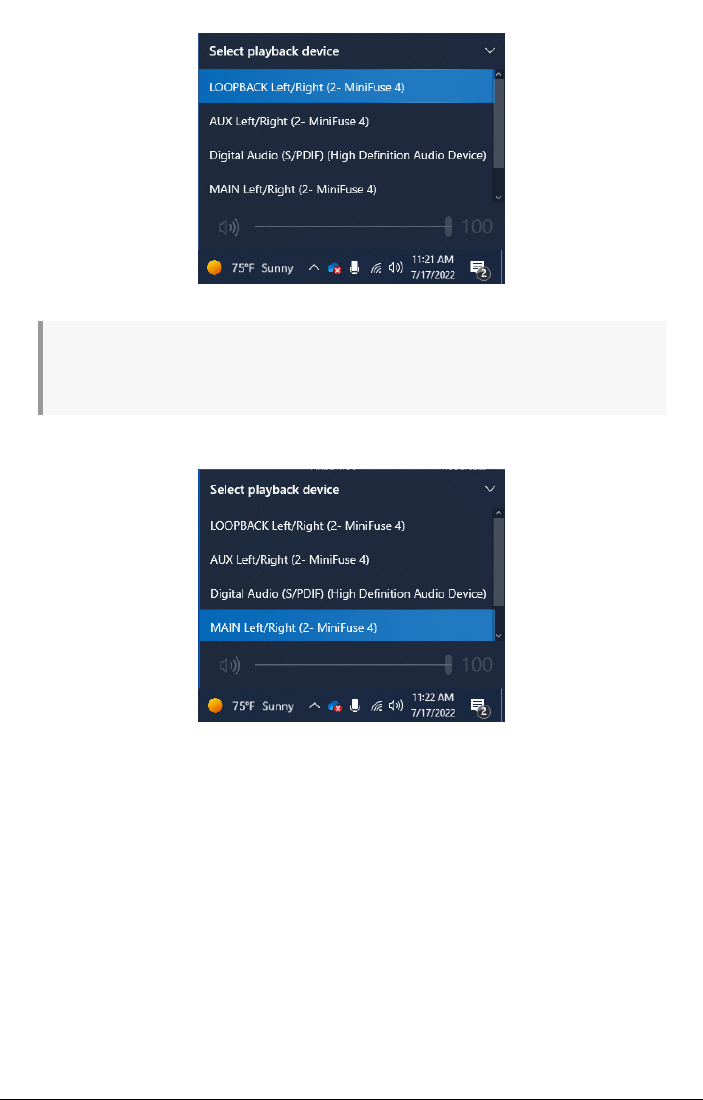
3. To route to Loopback instead, select the "LOOPBACK Left/Right" output.
Once you change your system output to use the Loopback output, you will not be able to hear any
computer audio until you a) record-enable a channel in your recording application, or b) switch the
output back to "MAIN Left/Right" from the Speaker icon in the taskbar.
4. To change the output back, select "MAIN Left/Right" output from the menu.
7.1.2. Record audio from specific applications
Some applications allow you to set an audio output independent of the system output. If
this is possible in the application you wish to record, you can route its audio output to the
MiniFuse Loopback output to record its audio into your DAW.
Here we will show you how to configure Reason to send its audio to the Loopback output.
The process will be similar for other applications.
1. In the Reason menu, click Preferences.
2. Click the Audio tab, and set the Audio Device to MiniFuse 4.
Arturia - User Manual MiniFuse 4 - Loopback Recording Feature 31
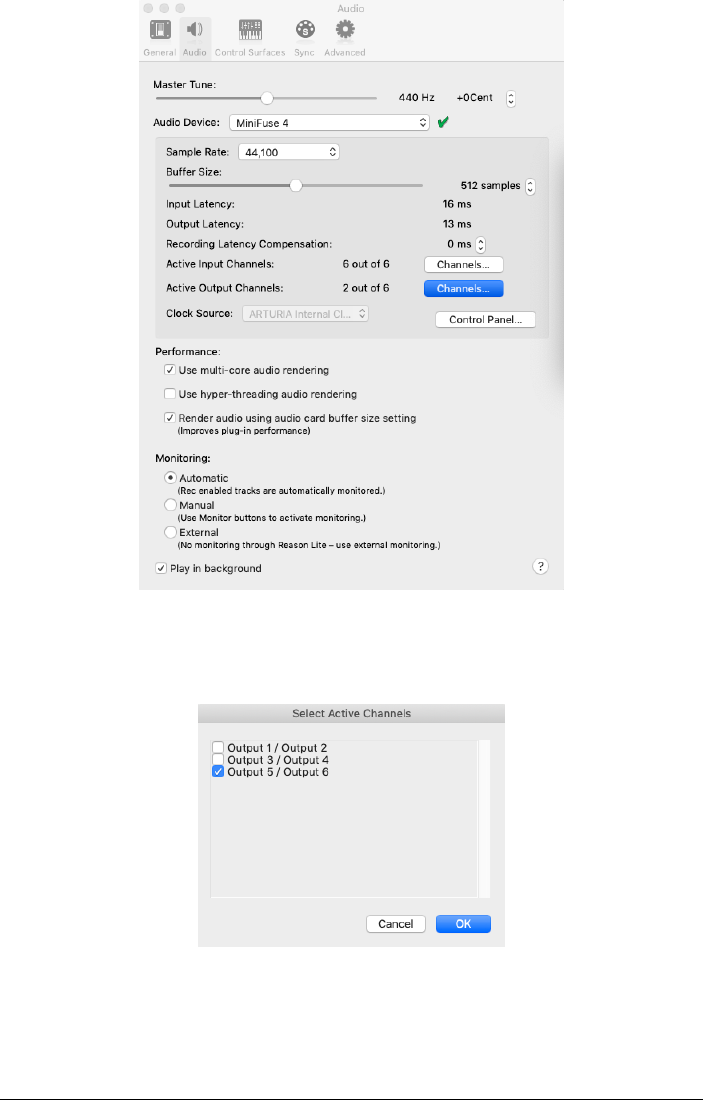
3. Click the Channels button next to Active Output Channels.
4. In the pop-up window, enable Output 5 / Output 6. This will send all audio from Reason
to the MiniFuse's Loopback feature.
32 Arturia - User Manual MiniFuse 4 - Loopback Recording Feature
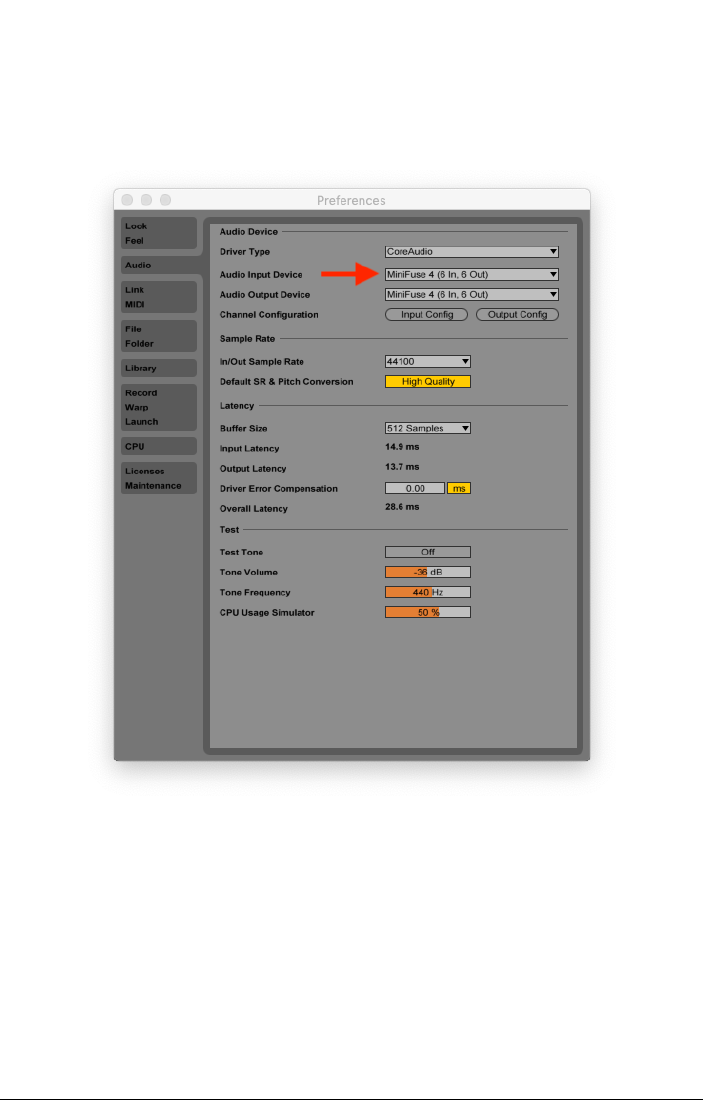
7.1.3. Recording into your DAW
Now that you have configured audio to be sent to the Loopback output, either from the entire
system or a specific application, open your preferred audio recording application. Here we
will show the process in Ableton Live. The process will be similar in other applications.
1. In the application's preferences, ensure that the MiniFuse 4 is configured to be used as
an input device.
Arturia - User Manual MiniFuse 4 - Loopback Recording Feature 33
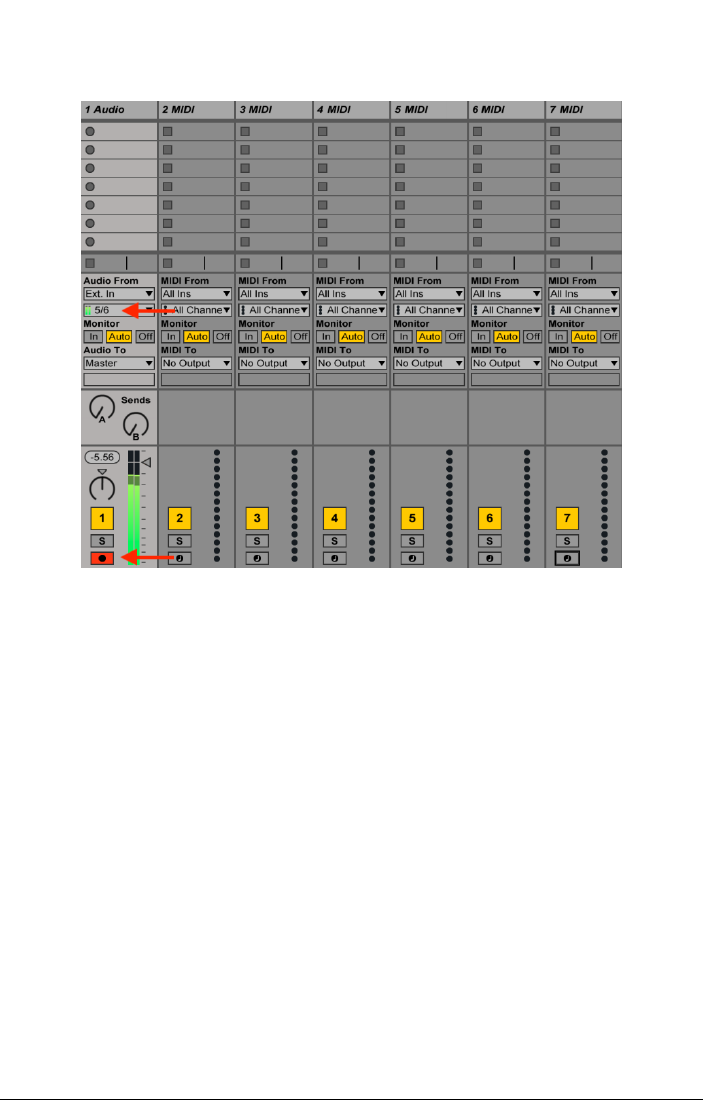
2. Next, create a new audio track in your project.
3. Select Loopback (channels 5 & 6) as the audio input for the track and record-enable the
track. You should now hear your computer audio playing through your DAW, and the meter
should display an audio level.
4. You are now ready to record. When ready, press the Record button in your application.
5. Once you are done recording and wish to set your computer system output back to
regular operation, return to the system audio preferences and change the system output to
use the Main outputs:
• On Mac, go back to the Configure Speakers panel in Applications / Utilities /
Audio MIDI Setup, and change the speaker outputs to "Main Left" and "Main Right".
• On Windows, click the Speaker icon in the taskbar, and select "MAIN Left/Right"
from the menu.
34 Arturia - User Manual MiniFuse 4 - Loopback Recording Feature
8. A QUICK PRIMER ON DIGITAL AUDIO
To get the most out of your computer and audio interface, it is important to be familiar
with several key concepts in digital audio. We'll explain these quickly below, so that you
understand their impact on performance. Once you are familiar with these concepts, you
will know how to best calibrate your interface and computer settings to handle different
types of audio tasks.
8.1. What is latency?
Latency is the amount of time that it takes your computer to process incoming and outgoing
sound. Latency is an important consideration when recording live instruments or MIDI parts,
as the delay between the input (audio or MIDI) and the audio output may negatively impact
the performance and recording - think of how distracting it can be to hear your own voice
with a short echo while on a phone call.
Latency is a direct byproduct of sample rate and buffer size settings, so adjusting these
settings in your host application or the audio driver will have an impact on latency.
8.2. Sample Rate
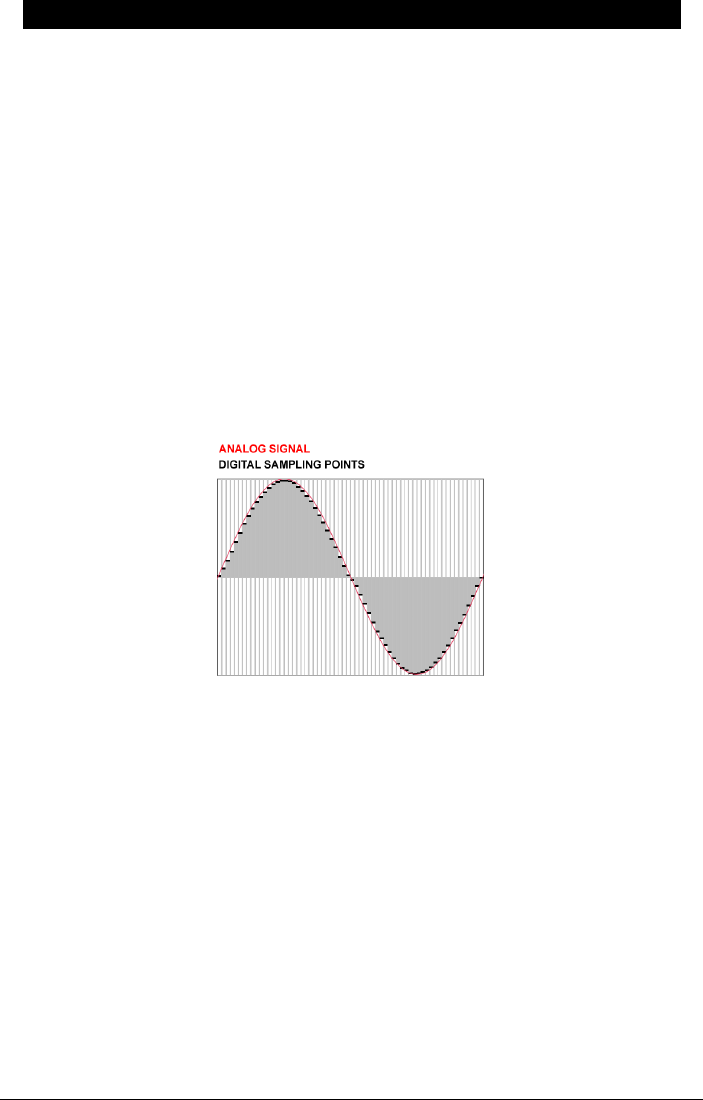
In the digital realm, analog audio signals are represented by discrete points in time, or
"samples". When played back through a digital-to-analog converter, like those in computer
soundcards, the digital samples are reproduced into a smooth audio signal. You can think
of it like frames in a movie - each frame is a still snapshot, but when played back at a fast
enough rate (24+ frames per second) our eyes perceive the sequence of static frames as
continuous motion.
The sampling rate describes the frequency of digital sampling points, or "frames", used to
approximate the audio signal over time. This also determines the highest frequency that can
be captured or reproduced by the digital representation. The Nyquist–Shannon sampling
theorem states that this is equal to 1/2 of the sample rate so, for example, the highest sound
frequency that can be reproduced by a sample rate of 48kHz is 24kHz.
The average range of human hearing is 20 to 20,000Hz (or 20kHz). For most audio
applications we recommend using a sample rate of 44.1kHz or 48kHz. Sample rate of CD-
quality audio is 44.1kHz. Higher sample rates will result in significantly higher CPU usage,
without much benefit to be gained in most circumstances.
Arturia - User Manual MiniFuse 4 - A Quick Primer on Digital Audio 35
Higher sample rates like 96kHz and above
can
be useful in sound design applications where you
would like flexibility to apply extreme pitch adjustments to the recording. A sound recorded at 96kHz
and played at half-speed would still be able to reproduce frequencies up to 24kHz, while the same
sound recorded at 48kHz and played at half speed will only be able to reproduce frequencies up to
12kHz.
8.3. Buffer Size
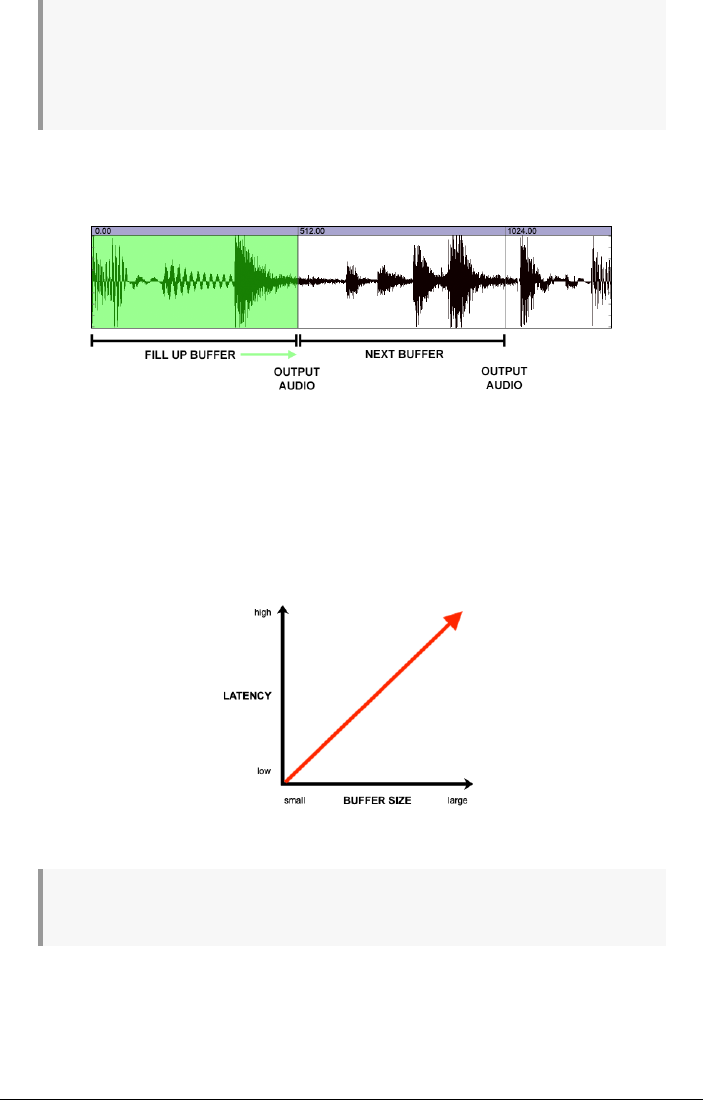
Buffer size is expressed in samples and is usually found in your application's audio settings.
Think of the buffer like a bucket. As soon as it fills up with samples, it is carried away to
the output. So, the smaller the bucket (buffer) the quicker it will get filled up and sent to the
output, and therefore will play back with less latency. The trade off, however, is that smaller
buffer sizes require your computer's CPU to work harder. Conversely, the bigger the bucket
(buffer) the longer it will take to fill up and be sent to the output. This decreases the load on
your CPU at the expense of more latency. As you will see below, changing the buffer size
depending on the type of audio task being performed is common practice.
If you experience clicks and pops in your projects, try increasing the buffer size in your host
application or the audio driver.
36 Arturia - User Manual MiniFuse 4 - A Quick Primer on Digital Audio

8.4. A red herring
When experimenting with these settings, you may notice that latency decreases noticeably
when using higher sample rates at the same buffer size. To go back to the bucket analogy,
the sample rate is like water flowing through a hose - if your increase the water flow (higher
sample rate), the same bucket will fill up faster and will be carried away to the output
sooner. However, keep in mind that high sample rates come at a cost of significantly higher
CPU usage, so this is not a recommended way of dealing with latency.
8.5. How to deal with latency
There are several ways to effectively deal with latency depending on the situation. Once you
are familiar with the concepts outlined above, you will be able to dynamically adjust your
system settings to accommodate various scenarios.
8.5.1. Recording live audio
When recording live audio from instruments and microphones, you probably want to avoid
latency altogether. The MiniFuse features Direct Monitoring which will route the input(s)
directly through the speakers or headphones. This lets you immediately hear what you’re
recording without incurring any latency from computer processing.
• Direct Monitoring is available in the MiniFuse Control Center application. For more
information on how to create custom mixes with direct monitoring, please see
the MiniFuse Control Center [p.19] section of this manual.
• When using Direct Monitoring, you may need to turn off monitoring for the
recording channel in your DAW to prevent an echo through the speakers or
headphones.
• Direct monitoring routes the input(s) directly out of the outputs, so you will not
be able to hear any software processing or effects that you may have applied to
the recording channel in your application.
• For best results, we also recommend shutting down other CPU-intensive
applications while recording live audio.
8.5.2. Recording a MIDI part
Since recording MIDI parts relies on the computer to produce sounds from your playing,
Direct Monitoring is not an option in this scenario. When recording MIDI parts, you will most
likely want to set a low audio buffer size in your host application’s audio settings to minimize
the delay between pressing a key and hearing the sound. We recommend buffer sizes of
128-256 samples but you could go lower or may need to go higher, depending on your
particular computer system and how much CPU your project is using.
8.5.3. Mixing and mastering
Mixing and mastering are not time-critical tasks, so latency is not as important in these
situations. It’s also likely that by this stage your project has quite a few tracks and plugins,
so your CPU may already be working hard to keep up. For mixing and mastering purposes
we recommend buffer sizes of 1024-2048 samples. Again, depending on your specific
system and project you may be able to use lower settings.
Arturia - User Manual MiniFuse 4 - A Quick Primer on Digital Audio 37

9. SPECIFICATIONS
9.1. Box Contents
• Audio interface
• USB-C to USB-A cable
• Optional power supply unit
• Regional power supply adapters
• Exclusive software bundle containing:
◦ Arturia's Pre 1973, Rev PLATE-140, Delay TAPE-201, Chorus JUN-6
audio effects
◦ Arturia's Analog Lab Intro containing thousands of ready-to-use
instruments and sounds
◦ Ableton Live Lite
◦ NI Guitar Rig 6 LE
◦ 3-month complimentary subscription to Splice
◦ 3-month complimentary subscription to Auto-Tune Unlimited
◦ Ableton Live Lite sessions curated by producers around the globe
9.2. Hardware Specifications
Line Inputs
Input impedance 15.4kΩ
Maximum input Level +22dBu
Gain range 56dB
Frequency response 20Hz to 20kHz +/-0.04dB
Dynamic range 114dB typical (A-weighted)
THD+N @ 1kHz -101dB typical (un-weighted)
Cross-talk @ 1kHz -121dB
Instrument Inputs
Input impedance 684KΩ
Maximum input Level +11dBu
Gain range 56dB
Frequency response 20Hz to 20kHz +/-0.04dB (min gain)
Dynamic range 114dB typical (A-weighted)
THD+N @ 1kHz -91dB typical (A-weighted)
38 Arturia - User Manual MiniFuse 4 - Specifications

Microphone Preamps
Input impedance 2.5kΩ
Maximum input Level +9dBu
Gain range 56dB
Equivalent Input Noise (EIN) -129dB typical (A-weighted)
Frequency response 20Hz to 20kHz +/-0.04dB (min gain)
Dynamic range 112dB typical (A-weighted)
THD+N @ 1kHz -102dB typical (A-weighted)
Cross-talk @ 1kHz -133dB
Speaker Outputs
Output impedance 98Ω
Maximum output Level +12dBu
Frequency response 20Hz to 20kHz +/-0.09dB
Dynamic range 110dB typical (A-weighted)
THD+N @ 1kHz -103dB typical (un-weighted)
Cross-talk @ 1kHz -108dB
Phones
Output impedance 11Ω
Maximum output Level +11dBu
Frequency response 20Hz to 20kHz +/-0.09dB
Dynamic range 101dB (A-weighted)
THD+N @ 1kHz -92dB (unweighted)
Power @ 33ohm 420mW
Various
Supported frequency rates 44.1 kHz, 48 kHz, 88.2 kHz, 96 kHz, 176.4 kHz, 192 kHz
USB 2 Audio compatibility Windows, Mac OS
Arturia - User Manual MiniFuse 4 - Specifications 39

10. DECLARATION OF CONFORMITY
USA
Important notice: DO NOT MODIFY THE UNIT!
This product, when installed as indicated in the instructions contained in this manual, meets
FCC requirement. Modifications not expressly approved by Arturia may avoid your authority,
granted by the FCC, to use the product.
IMPORTANT:
When connecting this product to accessories and/or another product, use only
high quality shielded cables. Cable (s) supplied with this product MUST be used. Follow all
installation instructions. Failure to follow instructions could void your FFC authorization to
use this product in the USA.
NOTE:
This product has been tested and found to comply with the limits for a Class B
Digital device, pursuant to Part 15 of the FCC rules. These limits are designed to provide
a reasonable protection against harmful interference in a residential environment. This
equipment generate, use and radiate radio frequency energy and, if not installed and used
according to the instructions found in the users manual, may cause interferences harmful
to the operation to other electronic devices. Compliance with FCC regulations does not
guarantee that interferences will not occur in all the installations. If this product is found to
be the source of interferences, which can be determined by turning the unit “OFF” and “ON”,
please try to eliminate the problem by using one of the following measures:
• Relocate either this product or the device that is affected by the interference.
• Use power outlets that are on different branch (circuit breaker or fuse) circuits or
install AC line filter(s).
• In the case of radio or TV interferences, relocate/ reorient the antenna. If the
antenna lead-in is 300 ohm ribbon lead, change the lead-in to coaxial cable.
• If these corrective measures do not bring any satisfied results, please contact
the local retailer authorized to distribute this type of product. If you cannot locate
the appropriate retailer, please contact Arturia.
The above statements apply ONLY to those products distributed in the USA.
CANADA
NOTICE:
This class B digital apparatus meets all the requirements of the Canadian
Interference-Causing Equipment Regulation.
AVIS
: Cet appareil numérique de la classe B respecte toutes les exigences du Règlement sur
le matériel brouilleur du Canada.
EUROPE
This product complies with the requirements of European Directive 2014/30/UE.
This product may not work correctly by the influence of electro-static discharge; if it
happens, simply restart the product.
40 Arturia - User Manual MiniFuse 4 - Declaration of Conformity

11. SOFTWARE LICENSE AGREEMENT
In consideration of payment of the Licensee fee, which is a portion of the price you paid,
Arturia, as Licensor, grants to you (hereinafter termed “Licensee”) a nonexclusive right to
use this copy of the SOFTWARE.
All intellectual property rights in the software belong to Arturia SA (hereinafter: “Arturia”).
Arturia permits you only to copy, download, install and use the software in accordance with
the terms and conditions of this Agreement.
The product contains product activation for protection against unlawful copying. The OEM
software can be used only following registration.
Internet access is required for the activation process. The terms and conditions for use of the
software by you, the end-user, appear below. By installing the software on your computer
you agree to these terms and conditions. Please read the following text carefully in its
entirety. If you do not approve these terms and conditions, you must not install this software.
In this event give the product back to where you have purchased it (including all written
material, the complete undamaged packing as well as the enclosed hardware) immediately
but at the latest within 30 days in return for a refund of the purchase price.
1. Software Ownership Arturia shall retain full and complete title to the SOFTWARE recorded
on the enclosed disks and all subsequent copies of the SOFTWARE, regardless of the media
or form on or in which the original disks or copies may exist. The License is not a sale of the
original SOFTWARE.
2. Grant of License Arturia grants you a non-exclusive license for the use of the software
according to the terms and conditions of this Agreement. You may not lease, loan or sub-
license the software. The use of the software within a network is illegal where there is the
possibility of a contemporaneous multiple use of the program.
You are entitled to prepare a backup copy of the software which will not be used for
purposes other than storage purposes.
You shall have no further right or interest to use the software other than the limited rights as
specified in this Agreement. Arturia reserves all rights not expressly granted.
3. Activation of the Software Arturia may use a compulsory activation of the software and
a compulsory registration of the OEM software for license control to protect the software
against unlawful copying. If you do not accept the terms and conditions of this Agreement,
the software will not work.
In such a case the product including the software may only be returned within 30 days
following acquisition of the product. Upon return a claim according to § 11 shall not apply.
4. Support, Upgrades and Updates after Product Registration You can only receive support,
upgrades and updates following the personal product registration. Support is provided only
for the current version and for the previous version during one year after publication of the
new version. Arturia can modify and partly or completely adjust the nature of the support
(hotline, forum on the website etc.), upgrades and updates at any time.
The product registration is possible during the activation process or at any time later through
the Internet. In such a process you are asked to agree to the storage and use of your
personal data (name, address, contact, email-address, and license data) for the purposes
specified above. Arturia may also forward these data to engaged third parties, in particular
distributors, for support purposes and for the verification of the upgrade or update right.
5. No Unbundling The software usually contains a variety of different files which in its
configuration ensure the complete functionality of the software. The software may be used
as one product only. It is not required that you use or install all components of the software.
You must not arrange components of the software in a new way and develop a modified
version of the software or a new product as a result. The configuration of the software may
not be modified for the purpose of distribution, assignment or resale.
Arturia - User Manual MiniFuse 4 - Software License Agreement 41

6. Assignment of Rights You may assign all your rights to use the software to another
person subject to the conditions that (a) you assign to this other person (i) this Agreement
and (ii) the software or hardware provided with the software, packed or preinstalled
thereon, including all copies, upgrades, updates, backup copies and previous versions,
which granted a right to an update or upgrade on this software, (b) you do not retain
upgrades, updates, backup copies und previous versions of this software and (c) the
recipient accepts the terms and conditions of this Agreement as well as other regulations
pursuant to which you acquired a valid software license.
A return of the product due to a failure to accept the terms and conditions of this Agreement,
e.g. the product activation, shall not be possible following the assignment of rights.
7. Upgrades and Updates You must have a valid license for the previous or more inferior
version of the software in order to be allowed to use an upgrade or update for the software.
Upon transferring this previous or more inferior version of the software to third parties the
right to use the upgrade or update of the software shall expire.
The acquisition of an upgrade or update does not in itself confer any right to use the
software.
The right of support for the previous or inferior version of the software expires upon the
installation of an upgrade or update.
8. Limited Warranty Arturia warrants that the disks on which the software is furnished is
free from defects in materials and workmanship under normal use for a period of thirty (30)
days from the date of purchase. Your receipt shall be evidence of the date of purchase. Any
implied warranties on the software are limited to thirty (30) days from the date of purchase.
Some states do not allow limitations on duration of an implied warranty, so the above
limitation may not apply to you. All programs and accompanying materials are provided “as
is” without warranty of any kind. The complete risk as to the quality and performance of the
programs is with you. Should the program prove defective, you assume the entire cost of all
necessary servicing, repair or correction.
9. Remedies Arturia's entire liability and your exclusive remedy shall be at Arturia's option
either (a) return of the purchase price or (b) replacement of the disk that does not meet the
Limited Warranty and which is returned to Arturia with a copy of your receipt. This limited
Warranty is void if failure of the software has resulted from accident, abuse, modification,
or misapplication. Any replacement software will be warranted for the remainder of the
original warranty period or thirty (30) days, whichever is longer.
10. No other Warranties The above warranties are in lieu of all other warranties, expressed
or implied, including but not limited to, the implied warranties of merchantability and fitness
for a particular purpose. No oral or written information or advice given by Arturia, its dealers,
distributors, agents or employees shall create a warranty or in any way increase the scope
of this limited warranty.
11. No Liability for Consequential Damages Neither Arturia nor anyone else involved in
the creation, production, or delivery of this product shall be liable for any direct, indirect,
consequential, or incidental damages arising out of the use of, or inability to use this product
(including without limitation, damages for loss of business profits, business interruption, loss
of business information and the like) even if Arturia was previously advised of the possibility
of such damages. Some states do not allow limitations on the length of an implied warranty
or the exclusion or limitation of incidental or consequential damages, so the above limitation
or exclusions may not apply to you. This warranty gives you specific legal rights, and you
may also have other rights which vary from state to state.
42 Arturia - User Manual MiniFuse 4 - Software License Agreement
